版本选择
Tip
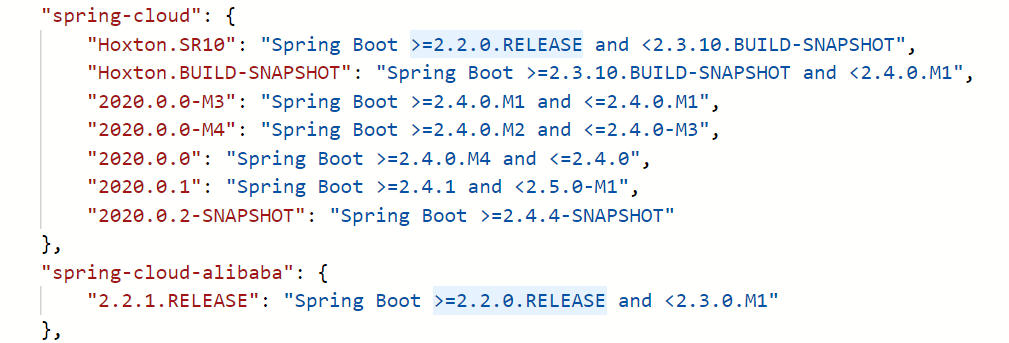
cloud: Hoxton.SR1
boot: 2.2.2.RELEASE
架构搭建
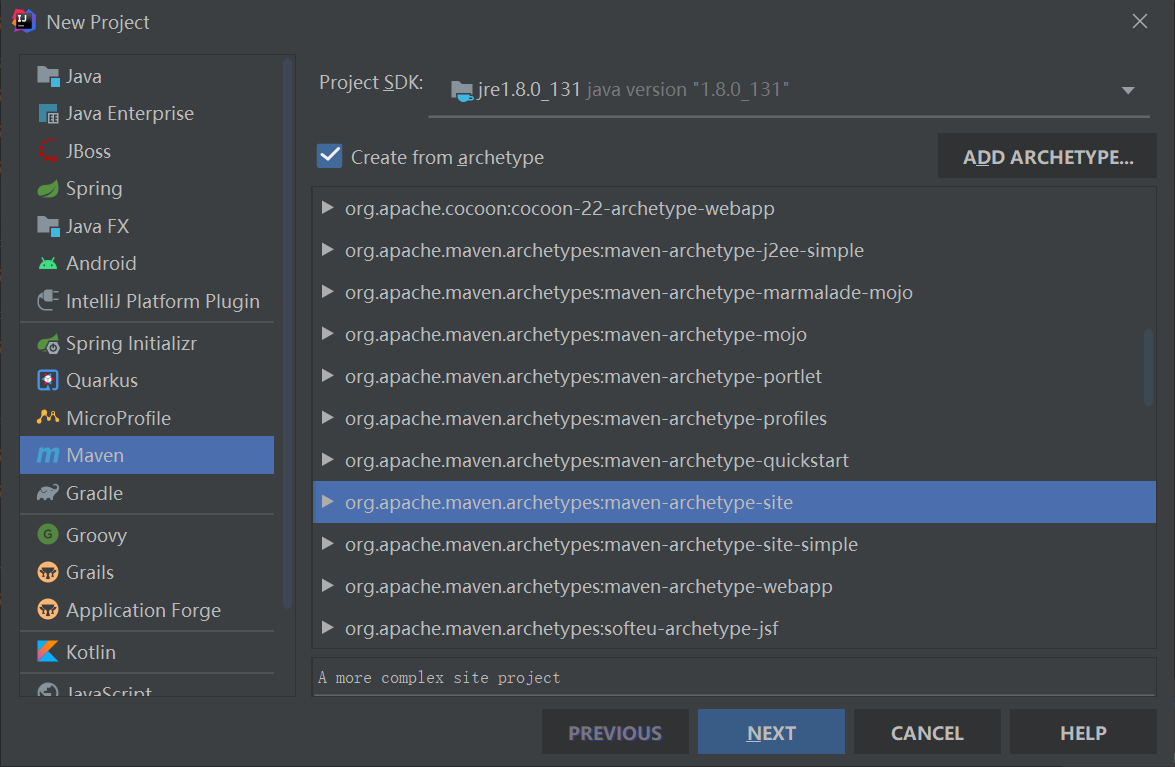
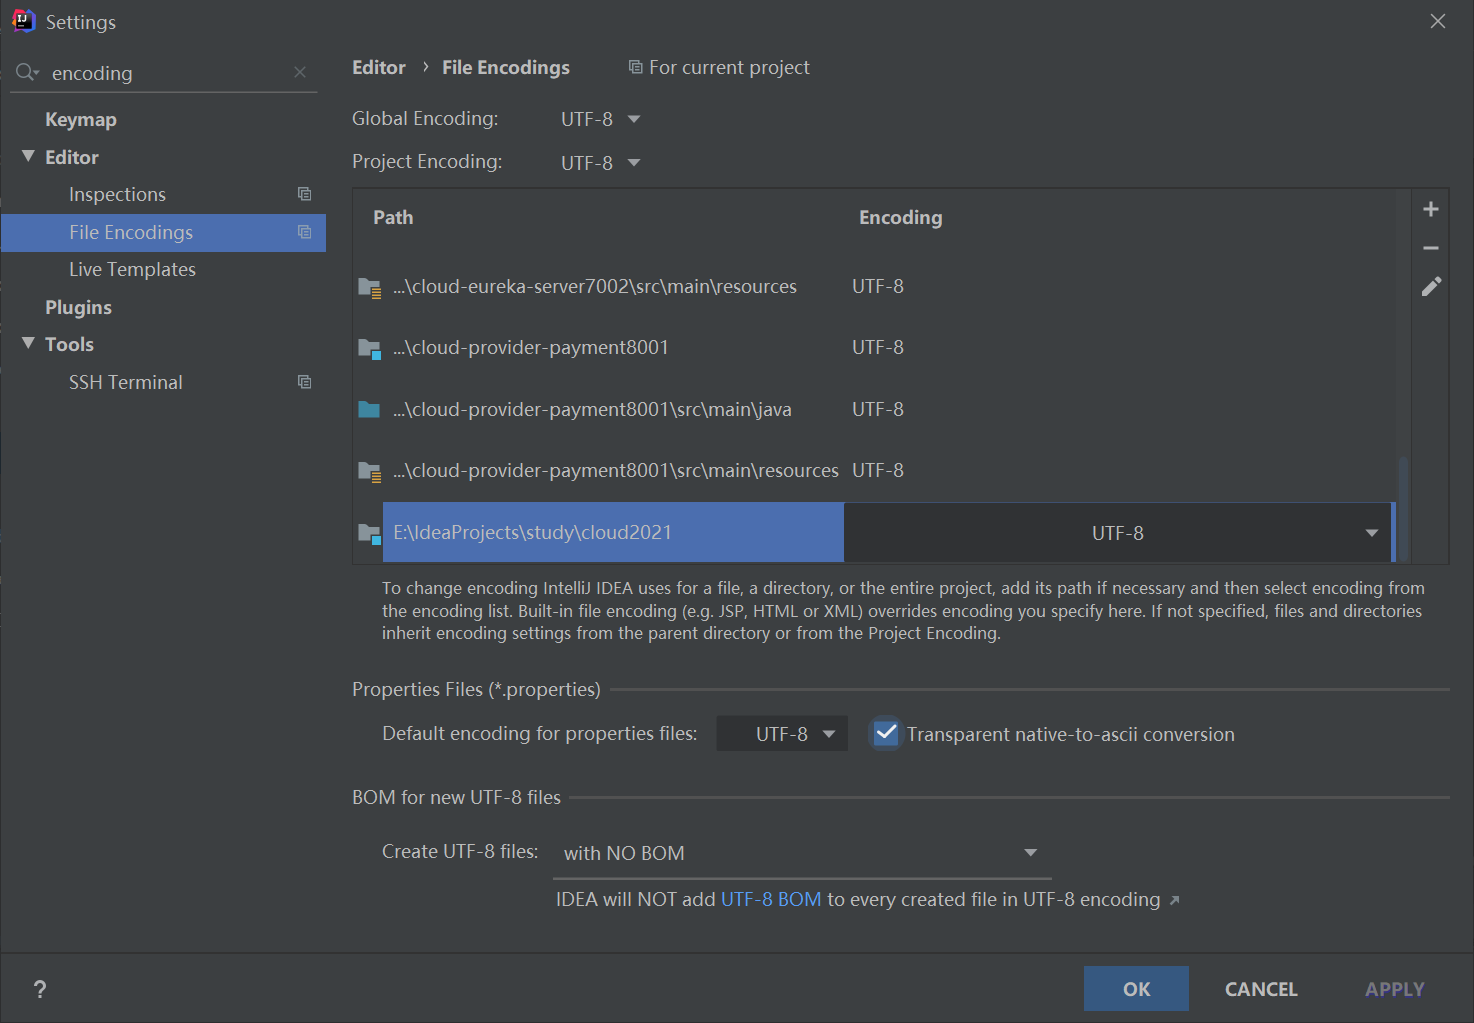
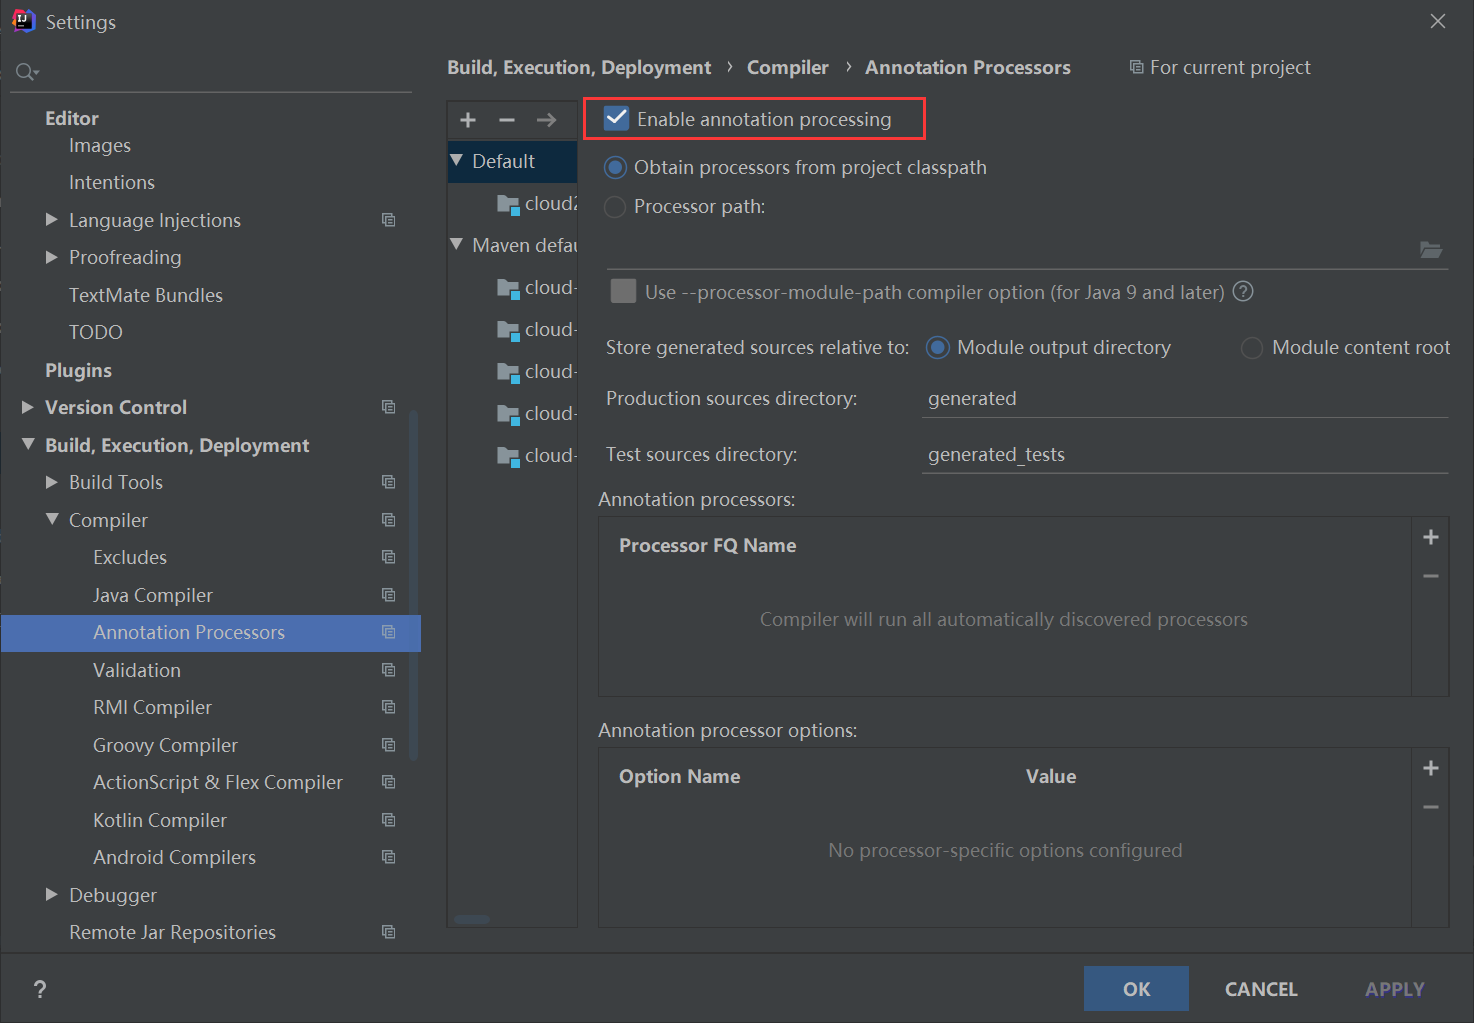
创建父工程

- 使用 maven 模板创建父工程
- 设置 utf-8 编码
- 开启注解
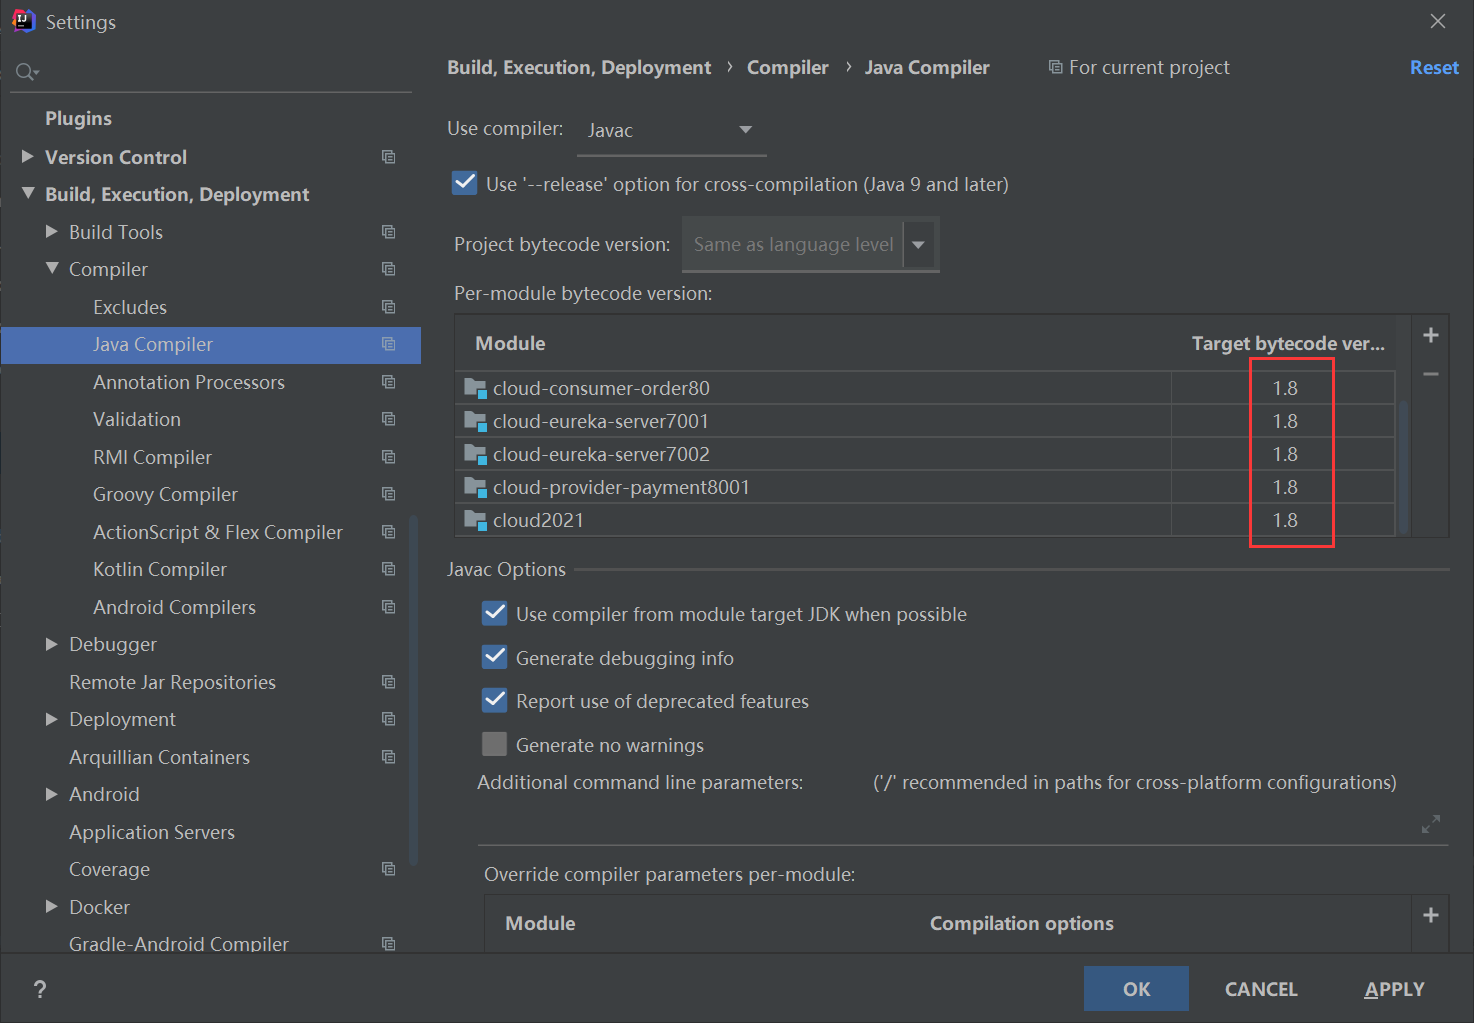
- 设置代码编译的 jdk 版本
- pom todo
Tip
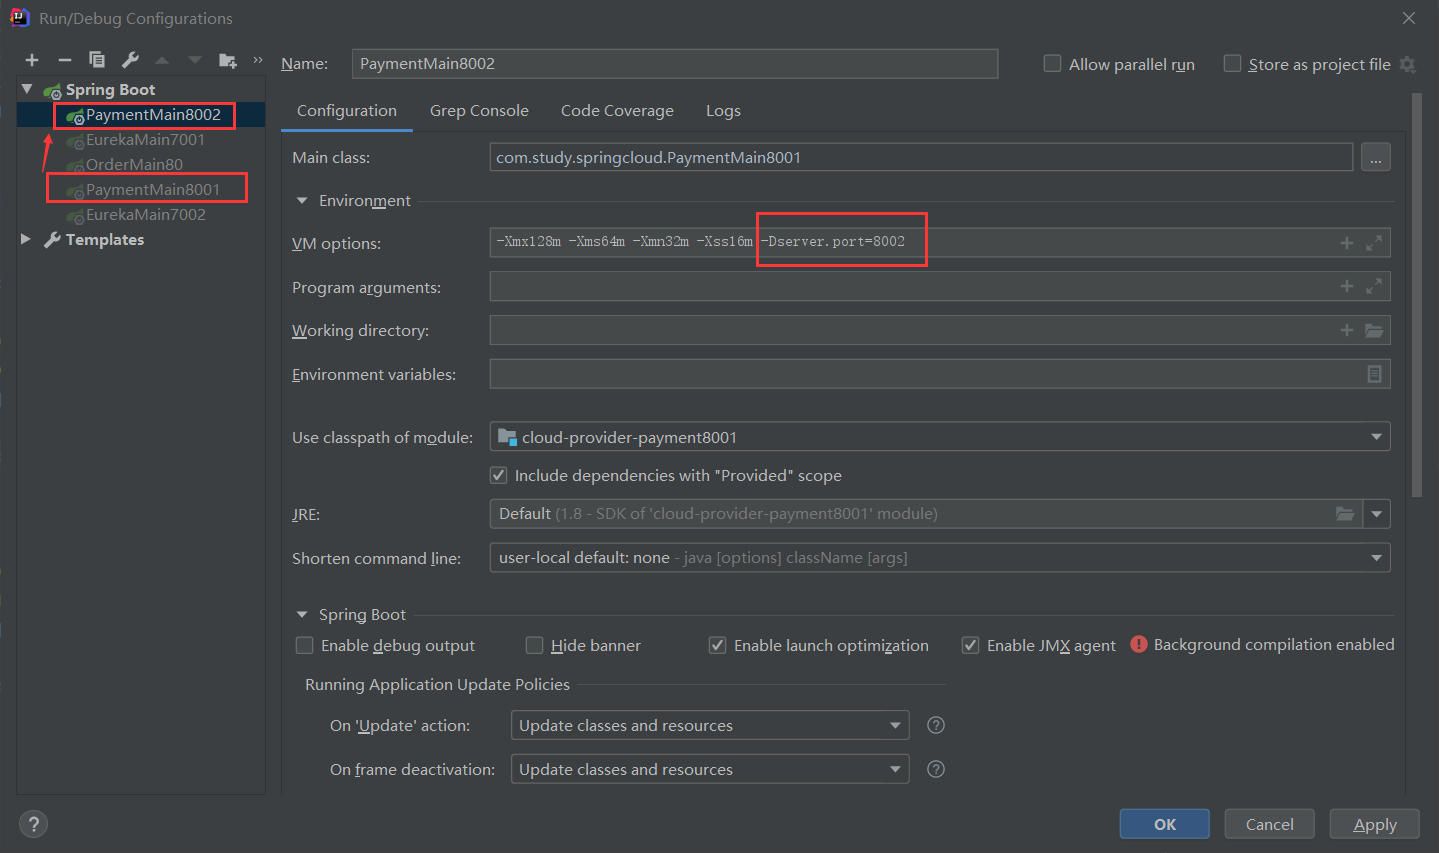
复制一份 8001 的配置,并修改端口为 8002,实现多份配置启动同一个项目
-Xmx128m -Xms64m -Xmn32m -Xss16m -Dserver.port=8002
创建服务提供者与消费者
todo
服务提供者
消费者
Eureka
服务注册
单机
服务端
pom
<!--eureka server-->
<dependency>
    <groupId>org.springframework.cloud</groupId>
    <artifactId>spring-cloud-starter-netflix-eureka-server</artifactId>
</dependency>
application.yml
server:
  port: 7001

eureka:
  instance:
    hostname: localhost # Eureka 服务端名称
  client:
    # false 表示不向注册中心注册自己
    register-with-eureka: false
    # false 表示自己就是注册中心,我的职责就是维护服务实例,并不需要去检索服务
    fetch-registry: false
    service-url:
      # 设置与 Eureka Server 交互的地址,查询服务和注册服务都需要依赖这个地址
      defaultZone: http://localhost:7001/eureka/
在启动类添加注解 @EnableEurekaServer
@SpringBootApplication
@EnableEurekaServer
public class EurekaMain7001 {
    private final static Logger logger = LoggerFactory.getLogger(EurekaMain7001.class);

    public static void main(String[] args) {
        SpringApplication.run(EurekaMain7001.class, args);
        logger.info("============= eureka-server7001 启动成功 =============");
    }
}
客户端
pom
<dependency>
    <groupId>org.springframework.cloud</groupId>
    <artifactId>spring-cloud-starter-netflix-eureka-client</artifactId>
</dependency>
application.yml
eureka:
  client:
    # 是否将自己注册进 Eureka Server 默认为 true
    register-with-eureka: true
    # 是否从 Eureka Server 抓取已有的注册信息,默认为 true
    # 单节点无所谓,集群必须设置为 true 才能配合 ribbon 使用负载均衡
    fetch-registry: true
    service-url:
      # 设置与 Eureka Server 交互的地址,查询服务和注册服务都需要依赖这个地址
     defaultZone: http://localhost:7001/eureka/
  instance:
    #instance-id: payment8001  # 设置服务名称
    prefer-ip-address: true   # 访问路径显示 ip
在启动类添加 @EnableEurekaClient
@EnableEurekaClient
@SpringBootApplication
public class PaymentMain8001 {
    private final static Logger logger = LoggerFactory.getLogger(PaymentMain8001.class);

    public static void main(String[] args) {
        SpringApplication.run(PaymentMain8001.class, args);
        logger.info("============= payment8001 启动成功 =============");
    }
}
集群
服务端
修改 host,用一台机器模拟两台机器

7001 节点
application.yml
server:
  port: 7001

eureka:
  instance:
    hostname: eureka7001.com # Eureka 服务端的实例名称
  client:
    # false 表示不向注册中心注册自己
    register-with-eureka: false
    # false 表示自己就是注册中心,我的职责就是维护服务实例,并不需要去检索服务
    fetch-registry: false
    service-url:
      # 设置与 Eureka Server 交互的地址,查询服务和注册服务都需要依赖这个地址
      defaultZone: http://eureka7002.com:7002/eureka/
7002 节点
application.yml
server:
  port: 7002

eureka:
  instance:
    hostname: eureka7002.com # Eureka 服务端的实例名称
  client:
    # false 表示不向注册中心注册自己
    register-with-eureka: false
    # false 表示自己就是注册中心,我的职责就是维护服务实例,并不需要去检索服务
    fetch-registry: false
    service-url:
      # 设置与 Eureka Server 交互的地址,查询服务和注册服务都需要依赖这个地址
      defaultZone: http://eureka7001.com:7001/eureka/
Tip
Eureka Server 启动以后,会在控制台不停地输出这样的日志:
Running the evict task with compensationTime 12ms如果想关闭这条日志,可以在application.yml设置日志的打印级别来过滤logging: level: com.netflix: warn
客户端
pom
<dependency>
    <groupId>org.springframework.cloud</groupId>
    <artifactId>spring-cloud-starter-netflix-eureka-client</artifactId>
</dependency>
application.yml
server:
  port: 8001

spring:
  application:
    name: cloud-payment-service # Eureka 服务名称
eureka:
  client:
    # 是否将自己注册进 Eureka Server 默认为 true
    register-with-eureka: true
    # 是否从 Eureka Server 抓取已有的注册信息,默认为 true 。单节点无所谓,集群必须设置为 true 才能配合 ribbon 使用负载均衡
    fetch-registry: true
    service-url:
      # 设置与 Eureka Server 交互的地址,查询服务和注册服务都需要依赖这个地址
      # 集群:多个 eureka 用逗号隔开
      defaultZone: http://eureka7001.com:7001/eureka/,http://eureka7002.com:7002/eureka/
在启动类添加 @EnableEurekaClient
@EnableEurekaClient
@SpringBootApplication
public class PaymentMain8001 {
    private final static Logger logger = LoggerFactory.getLogger(PaymentMain8001.class);

    public static void main(String[] args) {
        SpringApplication.run(PaymentMain8001.class, args);
        logger.info("============= payment8001 启动成功 =============");
    }
}
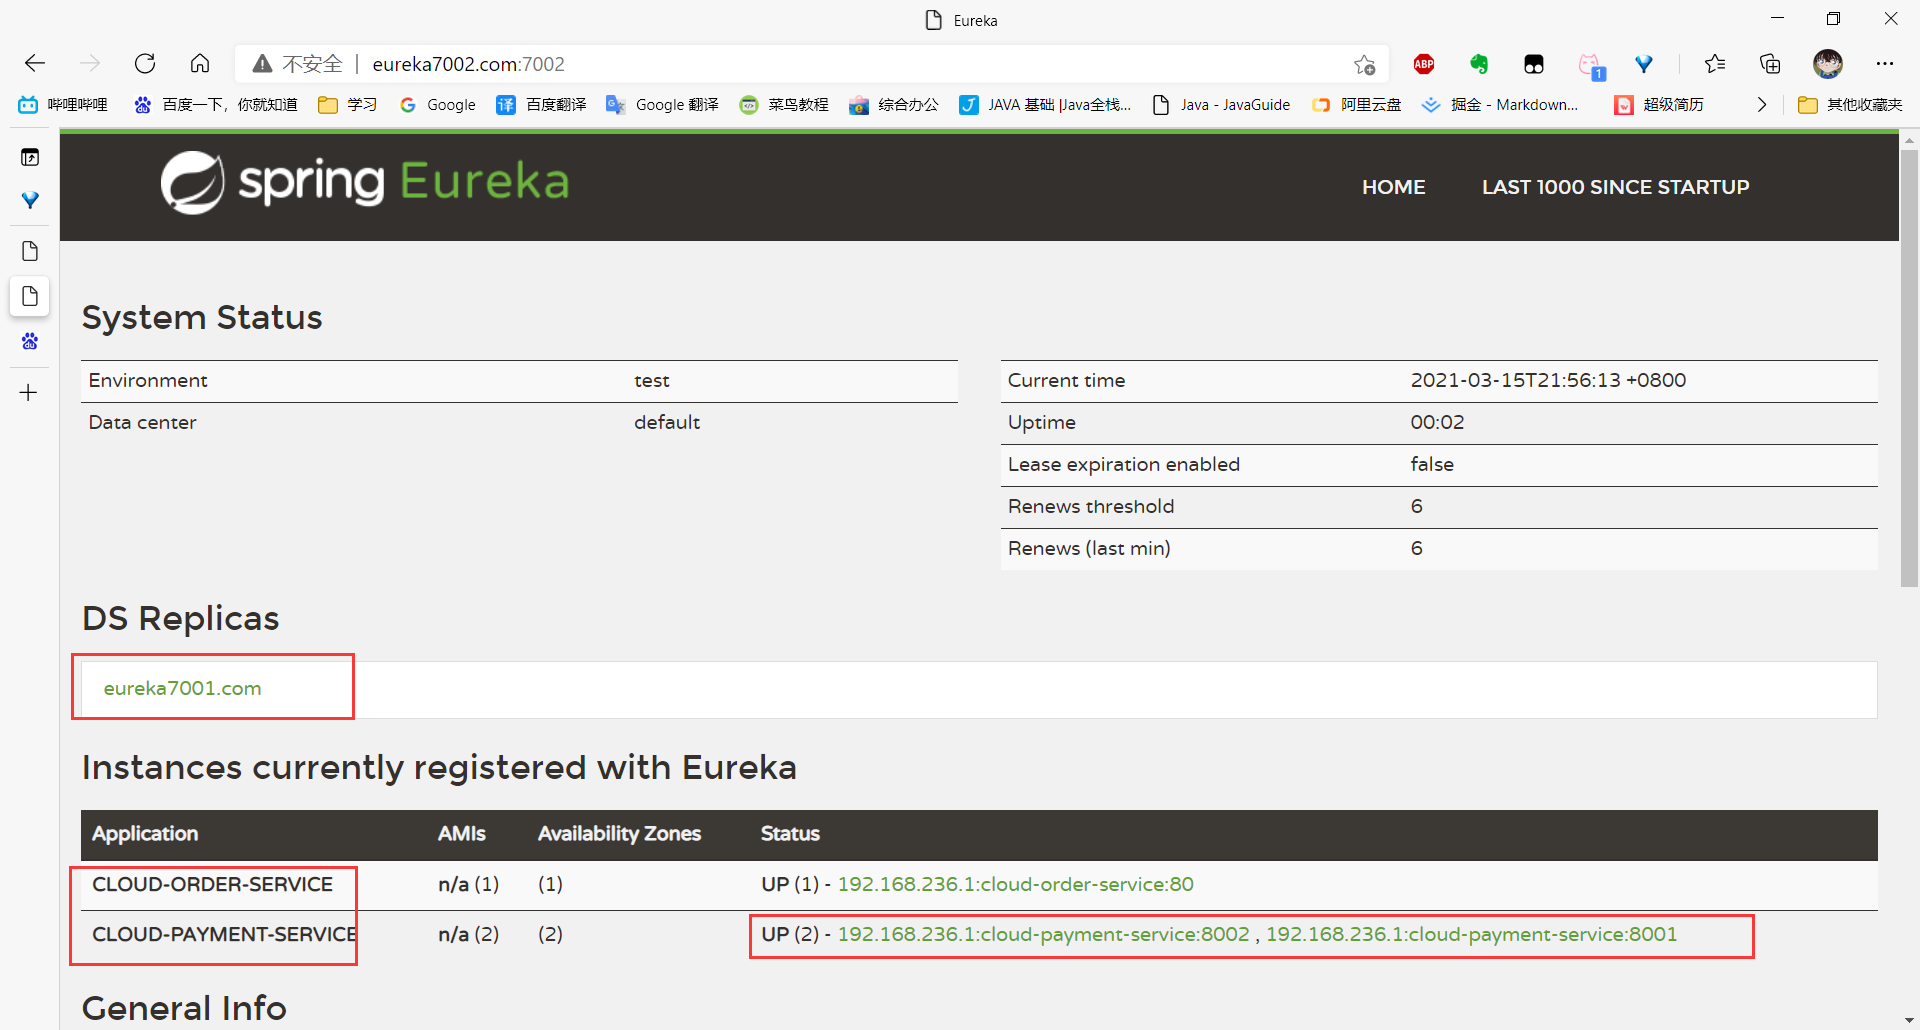
名词解释
DS Replicas:Eureka Server 的相邻节点,互为一个集群Instances currently registered with Eureka:当前在 Eureka 注册的实例
Status:UP:启用
自我保护机制
默认情况下,当 eureka server 在一定时间内没有收到实例的心跳,会把该实例从注册表中删除(默认是 90 秒)。但如果短时间内丢失大量的实例心跳,便会触发自我保护机制。即某时刻某一个微服务不可用,eureka 不会立即清理,依旧会对该微服务的信息进行保存。
开启
server
eureka:
  server:
    # 是否启用自我保护机制(默认为 true)
    enable-self-preservation: true
    # Eureka在一定时间内没有收到微服务的心跳,将注销服务,单位为毫秒(默认为90秒)
    eviction-interval-timer-in-ms: 90000
client
eureka:
  client:
    # 开启健康检查(需要spring-boot-starter-actuator依赖)
    healthcheck:
      enabled: true
  instance:
    # 续约更新时间间隔(发送心跳的间隔),单位为秒(默认30秒)
    lease-renewal-interval-in-seconds: 30
    # 续约到期时间,单位为秒(默认90秒)
    lease-expiration-duration-in-seconds: 90
EMERGENCY! EUREKA MAY BE INCORRECTLY CLAIMING INSTANCES ARE UP WHEN THEY'RE NOT. RENEWALS ARE LESSER THAN THRESHOLD AND HENCE THE INSTANCES ARE NOT BEING EXPIRED JUST TO BE SAFE.
Eureka 已经开启自我保护机制,不再删除服务注册表的服务(即使服务没有发送心跳)。因此 Eureka 的服务注册表可能存在不可用的服务。
关闭
server
eureka:
  server:
    # 是否启用自我保护机制(默认为 true)
    enable-self-preservation: false
    # Eureka在一定时间内没有收到微服务的心跳,将将注销服务,单位为毫秒(默认为90秒)
    eviction-interval-timer-in-ms: 90000
client
eureka:
  client:
    # 开启健康检查(需要spring-boot-starter-actuator依赖)
    healthcheck:
      enabled: true
  instance:
    # 续约更新时间间隔(发送心跳的间隔),单位为秒(默认30秒)
    lease-renewal-interval-in-seconds: 30
    # 续约到期时间,单位为秒(默认90秒)
    lease-expiration-duration-in-seconds: 90
THE SELF PRESERVATION MODE IS TURNED OFF. THIS MAY NOT PROTECT INSTANCE EXPIRY IN CASE OF NETWORK/OTHER PROBLEMS.
自我保护机制已经关闭,如果碰到网络故障,Eureka 不会保护不可用的实例。
建议
- 在开发环境关闭自我保护机制。开发期间微服务会被频繁重启,如果触发了保护机制,则旧的服务实例没有被删除,这时请求有可能跑到旧的实例中,而该实例已经关闭了,这就导致请求错误,影响开发测试。
- 在生产环境开启自我保护机制。防止服务由于网络波没有给 Eureka 发送心跳,这就导致 Eureka 将健康的服务注销了,即使网络恢复了,该服务也不会重新注册到 Eureka 了(只有在微服务启动的时候才会发起注册请求)
服务发现
在启动类添加 @EnableDiscoveryClient 注解
@EnableEurekaClient
@EnableDiscoveryClient
@SpringBootApplication
public class PaymentMain8001 {
    private final static Logger logger = LoggerFactory.getLogger(PaymentMain8001.class);

    public static void main(String[] args) {
        SpringApplication.run(PaymentMain8001.class, args);
        logger.info("============= payment8001 启动成功 =============");
    }
}
Controller 添加获取服务信息的接口
@Autowired
private DiscoveryClient discoveryClient;

/**
 * 测试 DiscoveryClient
 * @return
 */
@GetMapping("/payment/discovery")
public Object discovery() {
    //获取服务
    List<String> services = discoveryClient.getServices();
    services.stream().forEach(s -> {
        logger.info("***** service: {}", s);
    });

    //获取服务实例
    List<ServiceInstance> instances = discoveryClient.getInstances("CLOUD-PAYMENT-SERVICE");
    instances.stream().forEach(i -> {
        logger.info(i.getServiceId() + "\t" + i.getHost() + "\t" + i.getPort() + "\t" + i.getUri());
    });
    return this.discoveryClient;
}
认证
服务端
引入 spring security 依赖
<!--spring security-->
<dependency>
    <groupId>org.springframework.boot</groupId>
    <artifactId>spring-boot-starter-security</artifactId>
</dependency>
Attention
JDK 11 已经去掉了 Eureka 依赖的 JAXB 模块,因此需要显示引入依赖
<dependency>
   <groupId>org.glassfish.jaxb</groupId>
   <artifactId>jaxb-runtime</artifactId>
</dependency>
在 application.yml 配置账号密码
spring:
  security:
    user:
      name: root
      password: 123
添加 Java 配置 WebSecurityConfig
默认情况下,当 Spring Security 在类路径上时,它将要求向应用程序发送每个请求时都发送一个有效的 CSRF 令牌。 Eureka 客户端通常不会拥有有效的跨站点请求伪造 (CSRF) 令牌,因此需要为端点禁用此要求。
@EnableWebSecurity
publicclass WebSecurityConfig extends WebSecurityConfigurerAdapter {

    @Override
    protected void configure(HttpSecurity http) throws Exception {
        http.csrf().ignoringAntMatchers("/eureka/**");
        super.configure(http);
    }
}
客户端
在 application.yml 配置账号密码,以 账号:密码@ 的形式加到 hostname 的前面
eureka:
  client:
    register-with-eureka: true
    fetch-registry: true
    service-url:
      defaultZone: http://root:[email protected]:7001/eureka/
常用配置
eureka:
  client: # eureka客户端配置
    register-with-eureka:true # 是否将自己注册到eureka服务端上去
    fetch-registry:true # 是否获取eureka服务端上注册的服务列表
    service-url:
      defaultZone:http://localhost:8001/eureka/ # 指定注册中心地址
    enabled:true # 启用eureka客户端
    registry-fetch-interval-seconds:30 # 定义去eureka服务端获取服务列表的时间间隔
  instance: # eureka客户端实例配置
    lease-renewal-interval-in-seconds:30 # 定义服务多久去注册中心续约
    lease-expiration-duration-in-seconds:90 # 定义服务多久不去续约认为服务失效
    metadata-map:
      zone:jiangsu # 所在区域
    hostname:localhost # 服务主机名称
    prefer-ip-address:false # 是否优先使用ip来作为主机名
  server: # eureka服务端配置
    enable-self-preservation:false # 关闭eureka服务端的保护机制
Ribbon
集成到 Resttemplate
pom
<!--ribbon-->
<dependency>
    <groupId>org.springframework.cloud</groupId>
    <artifactId>spring-cloud-starter-netflix-ribbon</artifactId>
</dependency>
RestTemplate 的 bean 添加 @LoadBalanced 注解
@Bean
@LoadBalanced
public RestTemplate getRestTemplate() {
    return new RestTemplate();
}
集成到 OpenFeign
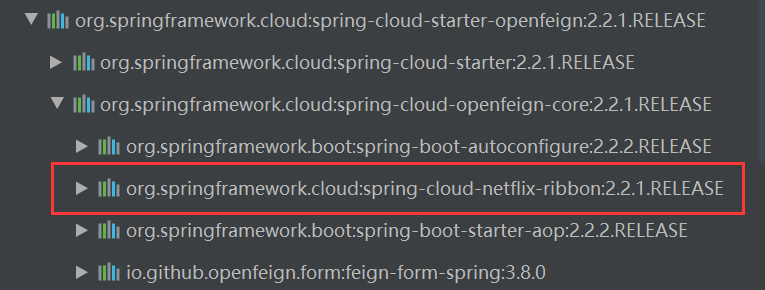
由于 OpenFeign 自动集成了 Ribbon,所以不需要手动引入依赖,直接配置负载均衡策略即可。
负载均衡策略
常用的负载均衡策略
-
RandomRule: 随机策略
-
RoundRobbinRule: 轮询策略(默认策略)
-
WeightedResponseTimeRule: 先采用轮询的策略,后续会根据服务的响应时间,自动分配权重,响应时间越快的服务权重越大被选中的概率越大
-
BestAvailableRule: 根据被调用方并发数最小的去分配
Info
全局配置
注解形式
注册一个 IRule 的实现类实例
@Bean
public IRule ribbonRule() {
    return new RandomRule();
}
配置形式
ribbon:
  ConnectTimeout:1000 # 服务请求连接超时时间(毫秒)
  ReadTimeout:3000 # 服务请求处理超时时间(毫秒)
  OkToRetryOnAllOperations:true # 对超时请求启用重试机制
  MaxAutoRetriesNextServer:1 # 切换重试实例的最大个数
  MaxAutoRetries:1 # 切换实例后重试最大次数
  NFLoadBalancerRuleClassName:com.netflix.loadbalancer.RandomRule # 修改负载均衡算法
给单个服务配置
配置形式
# 指定具体服务的负载均衡策略
CLOUD-PAYMENT-SERVICE:  #服务名称
  ribbon:
    NFLoadBalancerRuleClassName: com.netflix.loadbalancer.WeightedResponseTimeRule
OpenFeign
服务调用
pom
<!--openfeign-->
<dependency>
    <groupId>org.springframework.cloud</groupId>
    <artifactId>spring-cloud-starter-openfeign</artifactId>
</dependency>
<!--eureka client-->
<dependency>
    <groupId>org.springframework.cloud</groupId>
    <artifactId>spring-cloud-starter-netflix-eureka-client</artifactId>
</dependency>
<dependency>
    <groupId>org.springframework.boot</groupId>
    <artifactId>spring-boot-starter-web</artifactId>
</dependency>
<dependency>
    <groupId>org.springframework.boot</groupId>
    <artifactId>spring-boot-starter-actuator</artifactId>
</dependency>
application.yml
server:
  port: 80

eureka:
  client:
    # 作为客户端,不需要注册到 Eureka
    register-with-eureka: false
    service-url:
      defaultZone: http://eureka7001.com:7001/eureka/,http://eureka7002.com:7002/eureka/
启动类添加 @EnableFeignClients 注解
@EnableFeignClients
@SpringBootApplication
public class OrderFeignMain80 {
    public static void main(String[] args) {
        SpringApplication.run(OrderFeignMain80.class, args);
    }
}
新建 service 调用远程接口
@Service
//value:远程微服务的名称
@FeignClient(value = "CLOUD-PAYMENT-SERVICE")
public interface PaymentClient {
    //远程服务的接口地址
    @GetMapping("/payment/get/{id}")
    Result<Payment> getPaymentById(@PathVariable("id") Long id);
}
新建 controller 调用 Feign 接口
@RestController
public class OrderFeignController {
@Autowired
private PaymentClient paymentClient;
@GetMapping("/consumer/payment/get/{id}")
public Result<Payment> getPaymentById(@PathVariable("id") Long id) {
return paymentClient.getPaymentById(id);
}
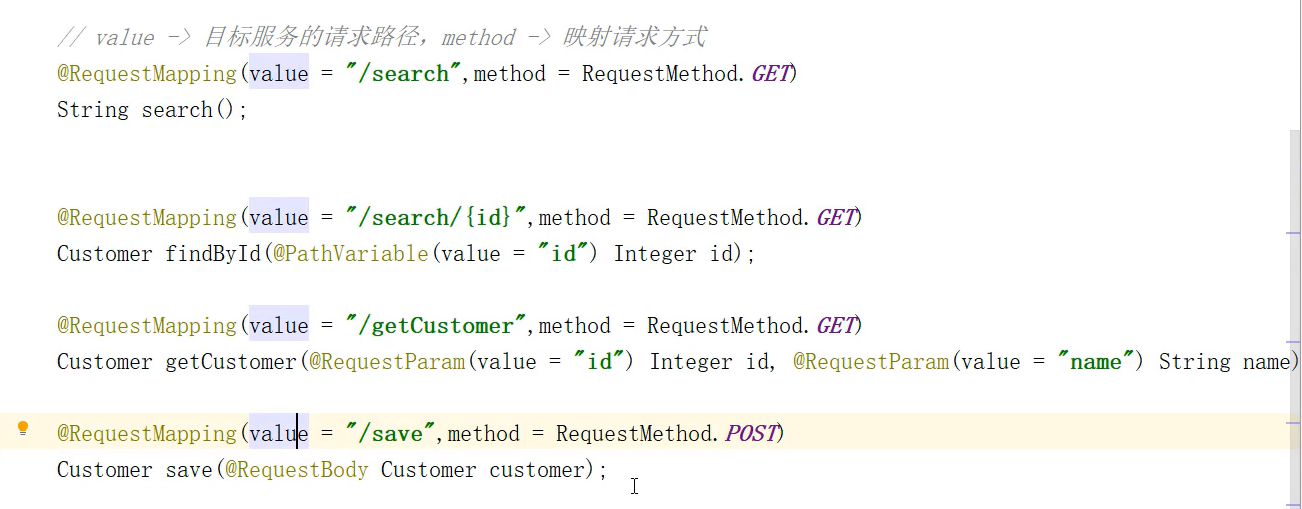
}传递参数的形式
- 如果传递的参数,比较复杂时,默认会采用
POST的请求方式。 - 传递单个参数时,推荐使用
@PathVariable,如果传递的单个参数比较多,也可以采用@RequestParam,不要省略value属性。 - 传递对象信息时,统一采用 json 的方式, 添加
@RequestBody。
Fallback
新增一个 POJO 类,并实现 Feign 接口
@Component
public class PaymentFallback implements PaymentClient {
    @Override
    public Result<Payment> getPaymentById(Long id) {
        return Result.failure(FAIL.code(), "支付服务繁忙,请稍后再试");
    }

    @Override
    public String paymentFeignTimeout() {
        return "支付服务超时,请稍后再试";
    }
}
在 Feign 接口的 @FeignClient 添加 fallback 属性,指定 fallback 类
@Service
//value:远程微服务的名称
@FeignClient(value = "CLOUD-PAYMENT-SERVICE", fallback = PaymentFallback.class)
public interface PaymentClient {
    @GetMapping("/payment/get/{id}")
    Result<Payment> getPaymentById(@PathVariable("id") Long id);

    @GetMapping("/payment/feign/timeout")
    String paymentFeignTimeout();
}
在 application.yml 开启 feign 的 hystrix 功能(openFeign 自动集成了 hystrix)
feign:
  hystrix:
    enabled: true
如果想要获取调用方的异常信息,使用以下方法:
FallBackFactory
- 新建
PaymentClientFallbackFactory类,并实现FallbackFactory接口,泛型填Feign接口 - 注入
PaymentClientFallback实例 - 重写
create方法,打印异常信息,返回PaymentClientFallback实例
@Component
public class PaymentClientFallbackFactory implements FallbackFactory<PaymentClient> {
    @Autowired
    private PaymentClientFallback paymentClientFallback;

    @Override
    public PaymentClient create(Throwable throwable) {
        //打印调用方的异常
        throwable.printStackTrace();
        return paymentClientFallback;
    }
}
在 Feign 接口的 @FeignClient 添加 fallbackFactory 属性,指定 FallbackFactory 类
@Service
//value:远程微服务的名称
@FeignClient(value = "CLOUD-PAYMENT-SERVICE",
        fallbackFactory = PaymentClientFallbackFactory.class)
public interface PaymentClient {
    @GetMapping("/payment/get/{id}")
    Result<Payment> getPaymentById(@PathVariable("id") Long id);

    @GetMapping("/payment/feign/timeout")
    String paymentFeignTimeout();
}
超时控制
默认情况下, Feign 客户端只等待一秒钟,如果远程接口处理超过 1 秒钟,Feign 客户端就会超时并返回报错。

为了避免这种情况,我们可以设置 Feign 客户端的超时控制。
# 设置客户端超时时间
ribbon:
  # 建立连接后,从服务器读取到可用资源所用的时间
  ReadTimeout: 5000
  # 建立连接所用的时间,适用于网络状况正常下,两端连接所用的时间
  ConnectTimeout: 5000
日志打印
OpenFeign 提供了日志打印功能,我们可以通过配置来调整日志级别,从而了解 Http 请求的细节。说白了就是对 Feign 接口的调用情况进行监控和输出。
日志级别:
NONE:默认的,不显示任何日志;BASIC:仅记录请求方法、URL、 响应状态码及执行时间;HEADERS:除了 BASIC 中定义的信息之外,还有请求和响应的头信息;FULL:除了 HEADERS 定义的信息之外,还有求和响应的正吸元数据。
新建 Feign 日志级别配置类
@Configuration
public class FeignConfig {

    @Bean
    Logger.Level feignLoggerLevel() {
        return Logger.Level.FULL;
    }
}
在 application.yml 配置接口日志级别
logging:
  level:
    # feign 日志以什么级别监控哪个接口
    com.study.springcloud.client.PaymentClient: debug
控制台详细日志信息

常用配置
feign:
  hystrix:
    enabled:true # 在Feign中开启Hystrix
  compression:
    request:
      enabled:false # 是否对请求进行GZIP压缩
      mime-types:text/xml,application/xml,application/json # 指定压缩的请求数据类型
      min-request-size:2048 # 超过该大小的请求会被压缩
    response:
      enabled:false # 是否对响应进行GZIP压缩
logging:
  level: # 修改日志级别
    com.macro.cloud.service.UserService:debug
Hystrix
Hystrix 主要是为了解决服务雪崩的问题
- 降级机制:当某个服务出现了超时、资源不足、异常时,可以执行一个降级方法,返回一个兜底数据。
- 隔离:提供了一个 Hystrix 线程池,信号量,和 Tomcat 的线程池相互隔离。
- 熔断:当某个服务的失败率达到一定的阈值时,自动触发降级。
- 缓存:请求缓存的功能。
服务降级
给自身方法配置服务降级
pom
<!--hystrix-->
<dependency>
    <groupId>org.springframework.cloud</groupId>
    <artifactId>spring-cloud-starter-netflix-hystrix</artifactId>
</dependency>
<!--eureka client-->
<dependency>
    <groupId>org.springframework.cloud</groupId>
    <artifactId>spring-cloud-starter-netflix-eureka-client</artifactId>
</dependency>
<dependency>
    <groupId>org.springframework.boot</groupId>
    <artifactId>spring-boot-starter-web</artifactId>
</dependency>
<dependency>
    <groupId>org.springframework.boot</groupId>
    <artifactId>spring-boot-starter-actuator</artifactId>
</dependency>
<dependency>
    <groupId>org.projectlombok</groupId>
    <artifactId>lombok</artifactId>
</dependency>
<dependency>
    <groupId>com.study.springcloud</groupId>
    <artifactId>cloud-common</artifactId>
</dependency>
application.yml
server:
  port: 8001

spring:
  application:
    name: cloud-provider-hystrix-payment

eureka:
  client:
    register-with-eureka: true
    fetch-registry: true
    service-url:
      defaultZone: http://eureka7001.com:7001/eureka/
    # 开启健康检查(需要spring-boot-starter-actuator依赖)
    healthcheck:
      enabled: true
  instance:
    prefer-ip-address: true   #访问路径显示 ip
    # 续约更新时间间隔(发送心跳的间隔),单位为秒(默认30秒)
    lease-renewal-interval-in-seconds: 5
    # 续约到期时间,单位为秒(默认90秒)
    lease-expiration-duration-in-seconds: 10
启动类,添加 @EnableCircuitBreaker 注解,开启断路器功能
@EnableEurekaClient
@EnableCircuitBreaker
@SpringBootApplication
public class PaymentHystrixMain8001 {
    public static void main(String[] args) {
        SpringApplication.run(PaymentHystrixMain8001.class, args);
    }
}
在要降级的方法上添加 @HystrixCommand 注解,配置超时时间和兜底方法,兜底方法的参数列表与降级方法保持一致;降级方法发生异常,也会调用兜底方法。
@HystrixCommand 常用参数
fallbackMethod:指定服务降级处理方法;ignoreExceptions:忽略某些异常,不发生服务降级;commandKey:命令名称,用于区分不同的命令;groupKey:分组名称,Hystrix 会根据不同的分组来统计命令的告警及仪表盘信息;threadPoolKey:线程池名称,用于划分线程池。
 /**
     * Service 层
     * 模拟处理时间3秒的接口
     * 如果处理时间超过3秒或者此方法抛异常,
     * @HystrixCommand 会兜底调用 paymentInfo_TimeOutHandler 方法
     * @param
     * @return
     */
    @HystrixCommand(fallbackMethod = "paymentInfo_TimeOutHandler", commandProperties = {
            @HystrixProperty(name = "execution.isolation.thread.timeoutInMilliseconds", value = "5000")
    })
    public String paymentInfo_TimeOut() {
        int timeOut = 3;
        //模拟异常
//        int a = 1/0;
        try {
            //模拟超时
            TimeUnit.SECONDS.sleep(timeOut);
        } catch (InterruptedException e) {
            e.printStackTrace();
        }
        return "线程:" + Thread.currentThread().getName() + "paymentInfo_TimeOut" + " 耗时(秒):" + timeOut;
    }

    /**
     * paymentInfo_TimeOut() 超时或异常后的兜底方法
     * @param
     * @return
     */
    public String paymentInfo_TimeOutHandler() {
        return "线程:" + Thread.currentThread().getName() + "paymentInfo_TimeOutHandler 降级";
    }
Feign 客户端的服务降级
pom
<!--hystrix-->
<dependency>
    <groupId>org.springframework.cloud</groupId>
    <artifactId>spring-cloud-starter-netflix-hystrix</artifactId>
</dependency>
<!--openfeign-->
<dependency>
    <groupId>org.springframework.cloud</groupId>
    <artifactId>spring-cloud-starter-openfeign</artifactId>
</dependency>
<!--eureka client-->
<dependency>
    <groupId>org.springframework.cloud</groupId>
    <artifactId>spring-cloud-starter-netflix-eureka-client</artifactId>
</dependency>
<dependency>
    <groupId>org.springframework.boot</groupId>
    <artifactId>spring-boot-starter-web</artifactId>
</dependency>
<dependency>
    <groupId>org.springframework.boot</groupId>
    <artifactId>spring-boot-starter-actuator</artifactId>
</dependency>
application.yml
server:
  port: 80

eureka:
  client:
    register-with-eureka: false
    service-url:
      defaultZone: http://eureka7001.com:7001/eureka/,http://eureka7002.com:7002/eureka/
# 设置客户端超时时间
ribbon:
  # 建立连接后,从服务器读取到可用资源所用的实际
  ReadTimeout: 5000
  # 建立连接所用的时间,适用于网络状况正常下,两端连接所用的时间
  ConnectTimeout: 5000
启动类,添加 @EnableHystrix 注解,@EnableHystrix 继承了@EnableCircuitBreaker
@EnableHystrix
@EnableFeignClients
@SpringBootApplication
public class OrderHystrixMain80 {
    public static void main(String[] args) {
        SpringApplication.run(OrderHystrixMain80.class, args);
    }
}
在要降级的方法上添加 @HystrixCommand 注解,配置超时时间和兜底方法,兜底方法的参数列表与降级方法保持一致;降级方法发生异常,也会调用兜底方法
//Controller 层
@GetMapping("/consumer/payment/hystrix/timeout")
@HystrixCommand(fallbackMethod = "paymentTimeOutFallbackMethod", commandProperties = {
        @HystrixProperty(name = "execution.isolation.thread.timeoutInMilliseconds", value = "5000")
})
public String paymentInfo_TimeOut () {
    return paymentHystrixClient.paymentInfo_TimeOut();
}

public String paymentTimeOutFallbackMethod() {
    return "我是消费者,支付系统系统繁忙请稍后重试,或者系统运行出错请检查日志";
}
全局统一 Fallback
在使用了 @HystrixCommand 的类,添加 @DefaultProperties 注解,defaultFallback 指定全局统一 FallbackMethod;
默认超时时间为 1 秒,即远程调用响应时间超过 1 秒,会触发 FallbackMethod
@DefaultProperties(defaultFallback = "paymentGlobalFallbackMethod")
@RestController
public class OrderHystrixController {
    @Autowired
    private PaymentHystrixClient paymentHystrixClient;

    @GetMapping("/consumer/payment/hystrix/ok/{id}")
    public String paymentInfo_OK (@PathVariable("id") Integer id) {
        String result = paymentHystrixClient.paymentInfo_OK(id);
        return result;
    }

    @HystrixCommand
    @GetMapping("/consumer/payment/hystrix/timeout")
    public String paymentInfo_TimeOut () {
        return paymentHystrixClient.paymentInfo_TimeOut();
    }

    /**
     * 全局统一 Fallback
     * 触发条件:使用了@HystrixCommand,但没有指定 FallbackMethod
     * @return
     */
    public String paymentGlobalFallbackMethod() {
        return "Global异常处理信息,请稍后再试~";
    }
}
线程隔离
一般情况,tomcat 的线程池接收用户的请求,并且去执行其他服务的功能,如果某一个服务出现了故障,会导致 tomcat 的线程大量堆积,tomcat 无法处理其他业务功能。
- Hystrix 的线程池 (默认启用):接收用户请求采用 tomcat 的线程池;执行业务代码,调用其他服务时,采用 Hystrix 的线程池。
- 信号量:使用的还是 tomcat 的线程池,信号量帮助我们去管理 tomcat 的线程池。
-
Hystrix 的线程池配置(具体的配置 name 属性需要去查看
HystrixCommandProperties类)- 线程隔离策略:
name=hystrix.command.default.execution.isolation.strategy,value=THREAD,[SEMAPHORE] - 指定超时时间:
name=hystrix.command.default.execution.isolation.thread.timeoutInMilliseconds,value=1000 - 是否开启超时时间配置:
name=hystrix.command.default.execution.timeout.enabled,value=true - 超时之后是否中断线程:
name=hystrix.command.default.execution.isolation.thread.interruptOnTimeout,value=true - 取消任务后是否中断线程:
name=hystrix.command.default.execution.isolation.thread.interruptOnCancel,value=false
- 线程隔离策略:
@HystrixCommand(commandProperties = {
        @HystrixProperty(name = "execution.isolation.strategy", value = "THREAD"),
        @HystrixProperty(name = "execution.isolation.thread.timeoutInMilliseconds", value = "1500")
})-
信号量的配置
- 线程隔离策略:
name=hystrix.command.default.execution.isolation.strateg,value=SEMAPHORE,[THREAD] - 指定信号量的最大并发请求数:
name=hystrix.command.default.execution.isolation.semaphore.maxConcurrentRequests,value=10
- 线程隔离策略:
@HystrixCommand(fallbackMethod = "paymentInfo_TimeOutHandler", commandProperties = {
        @HystrixProperty(name = "execution.isolation.strategy", value = "SEMAPHORE")
})
服务熔断
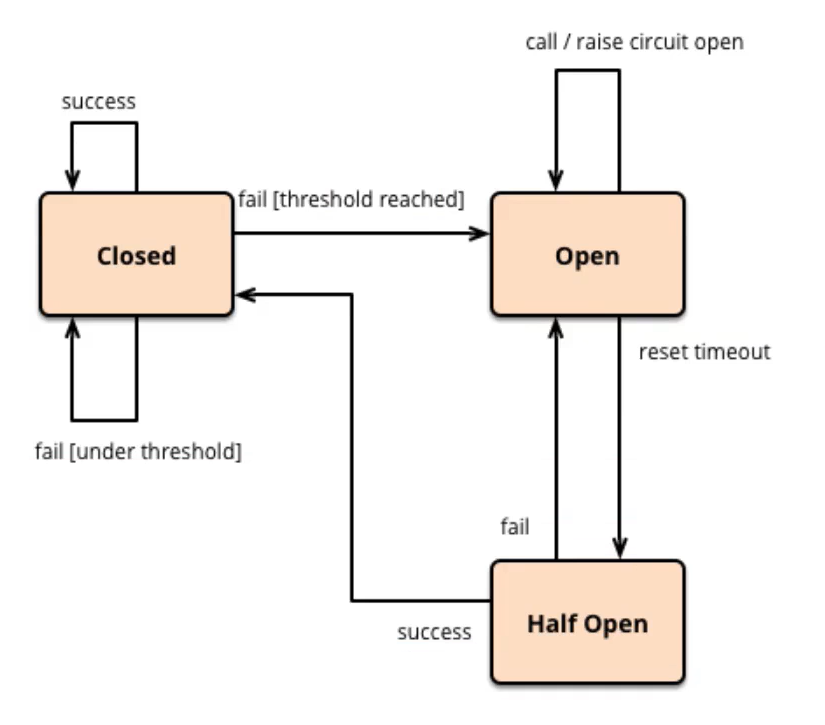
断路器
在调用指定服务时,如果这个服务的失败率达到配置的阈值时,断路器从 closed 状态转变为 open 状态。此时指定服务是无法被访问的,如果访问就直接调用 fallback 方法。
在一定的时间内,open 状态会再次转变为 half open 状态,允许一个请求发送到指定服务。如果成功,断路器转变为 closed;如果失败,断路器再次转变为 open 状态,断路器在 open 与 half open 之间循环,直到断路器回到 closed 状态。
配置断路器仪表盘
pom
<!--hystrix-->
<dependency>
    <groupId>org.springframework.cloud</groupId>
    <artifactId>spring-cloud-starter-netflix-hystrix</artifactId>
</dependency>
<!--hystrix dashboard-->
<dependency>
    <groupId>org.springframework.cloud</groupId>
    <artifactId>spring-cloud-starter-netflix-hystrix-dashboard</artifactId>
</dependency>
<!--eureka client-->
<dependency>
    <groupId>org.springframework.cloud</groupId>
    <artifactId>spring-cloud-starter-netflix-eureka-client</artifactId>
</dependency>
<dependency>
    <groupId>org.springframework.boot</groupId>
    <artifactId>spring-boot-starter-web</artifactId>
</dependency>
<dependency>
    <groupId>org.springframework.boot</groupId>
    <artifactId>spring-boot-starter-actuator</artifactId>
</dependency>
启动类添加 @EnableHystrixDashboard 注解,开启 Hystrix 仪表盘功能
@EnableEurekaClient
@EnableCircuitBreaker
@EnableHystrixDashboard
@SpringBootApplication
public class PaymentHystrixMain8001 {
    public static void main(String[] args) {
        SpringApplication.run(PaymentHystrixMain8001.class, args);
    }
}
Attention
如果 Spring Boot 版本是 2.x 以上,需要配置一个 Servlet 路径,指定 Hystrix 的 Servlet
@WebServlet("/hystrix.stream")
public class HystrixServlet extends HystrixMetricsStreamServlet {
}
//在启动类上添加扫描 servlet 的注解
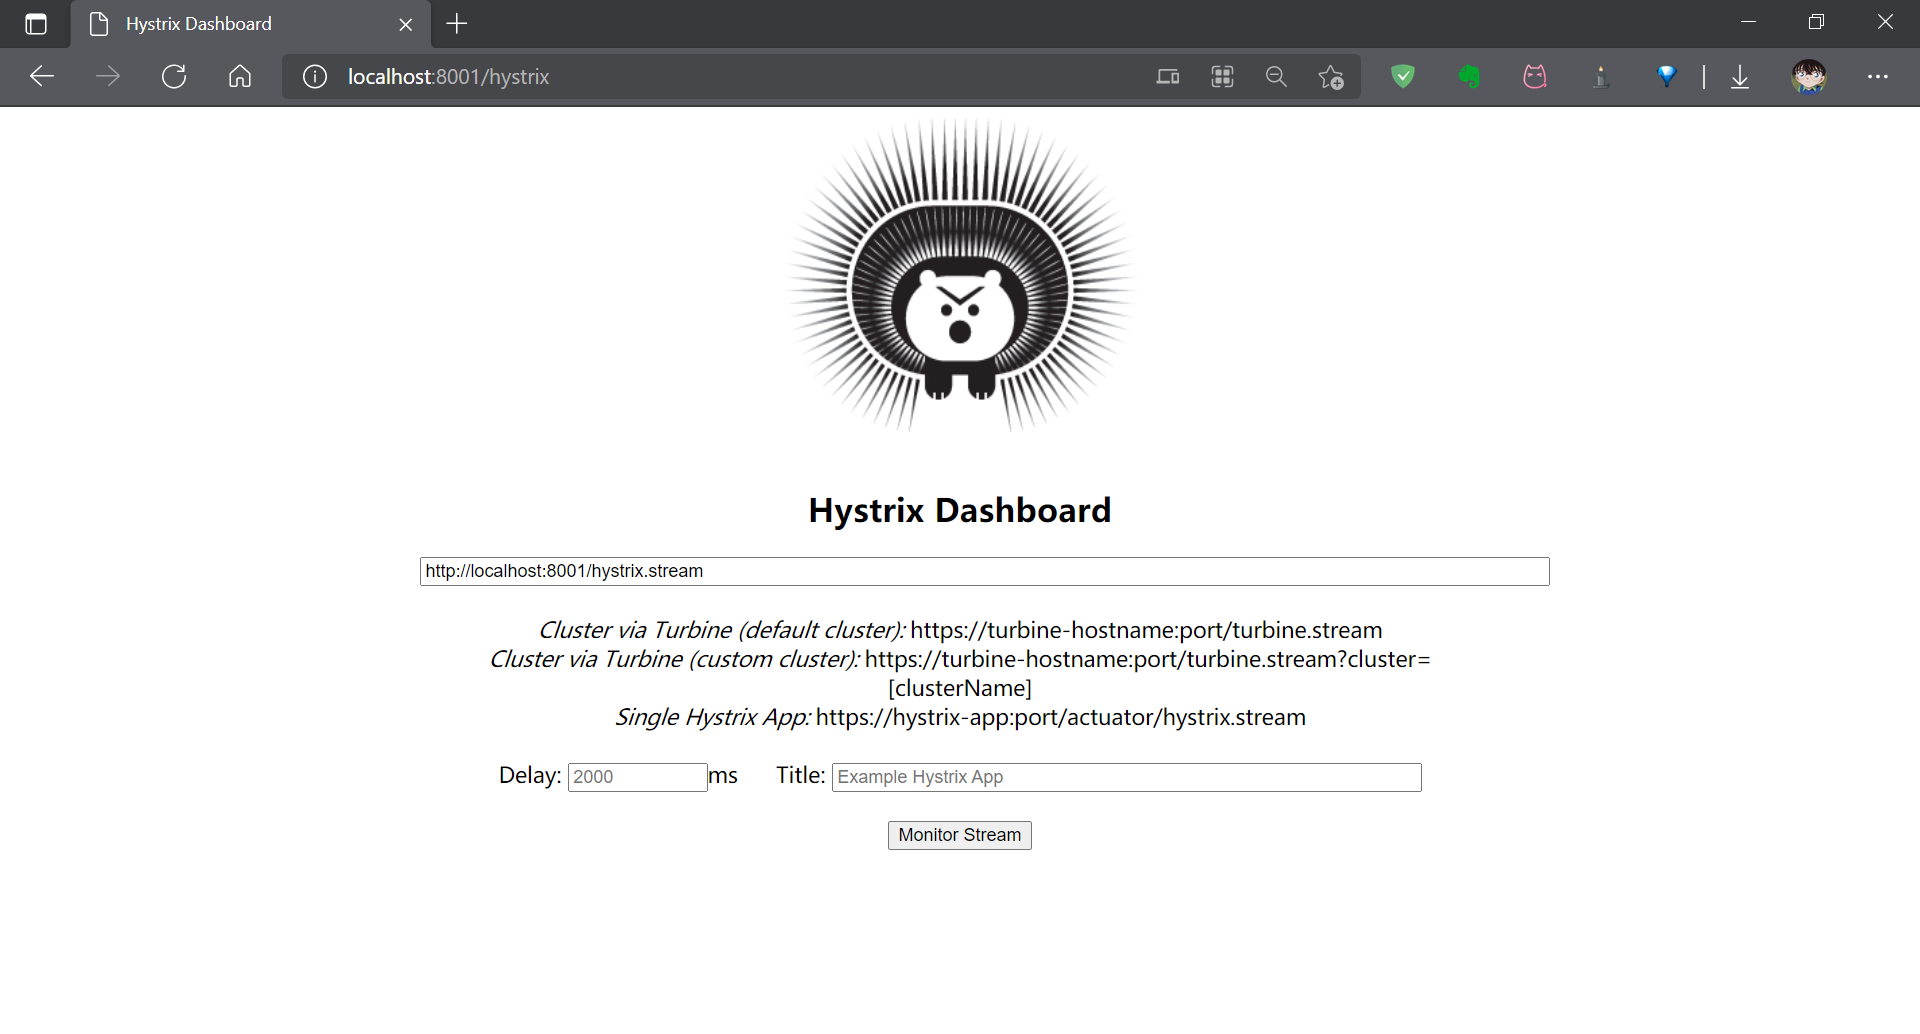
@ServletComponentScan("com.study.springcloud.servlet")浏览器访问 http://localhost:8001/hystrix,再输入 servlet 的路径,这里配的是 http://localhost:8001/hystrix.stream,最后点击 Monitor Stream 按钮
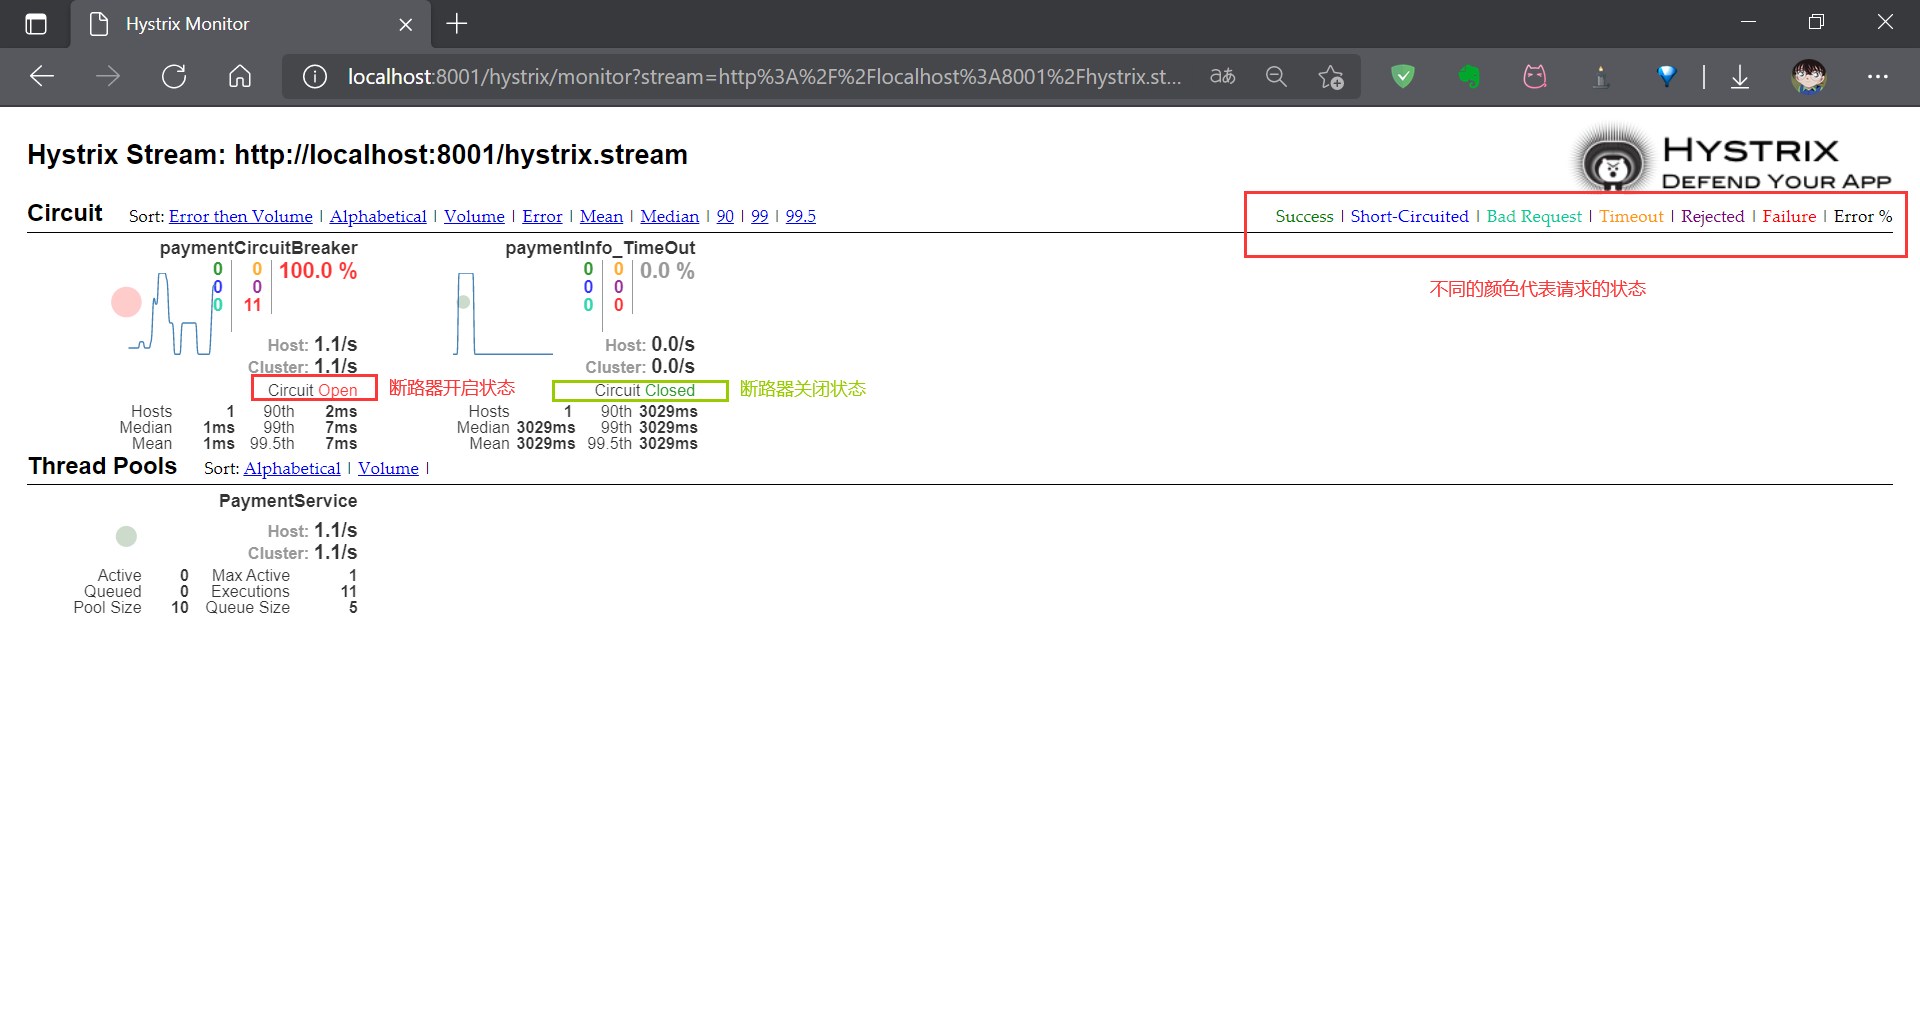
然后就可以通过发请求,来观察断路器的状态了
配置断路器的属性
1.断路器的开关: name=hystrix.command.default.circuitBreaker.enabled,value=true
2.失败阈值的总请求数: name=hystrix.command.default.circuitBreaker.requestVolumeThreshold,value=20
3.请求总数失败率达到 % 多少时: name=hystrix.command.default.circuitBreaker.errorThresholdPercentage,value=50
4.断路器 open 状态后, 多少秒是拒绝请求的: name= hystrix.command.default.circuitBreaker.sleepWindowInMilliseconds,value= 5000
5.强制让服务拒绝请求: name=hystrix.command.default.circuitBreaker.forceOpen,value=false
6.强制让服务接收请求: name=hystrix.command.default.circuitBreaker.forceClosed,value=false
paymentCircuitBreaker() 发生异常后,先进行服务降级,在窗口期内(默认 10s),10 个请求的失败率达到 60%后,触发服务熔断(不在调用主逻辑,而是直接调用 fallback 方法),熔断 10s 后,允许重试
@Service
public class PaymentService {
/**
* 配置了服务熔断的方法
* circuitBreaker.enabled:是否开启断路器
* circuitBreaker.requestVolumeThreshold:在窗口期时间内的请求次数(metricsRollingStatisticalWindowBuckets)
* circuitBreaker.sleepWindowInMilliseconds:熔断多少毫秒后,允许重试,在这之前一直调用 fallback 方法
* circuitBreaker.errorThresholdPercentage:失败率达到多少触发熔断
* @param id
* @return
*/
@HystrixCommand(fallbackMethod = "paymentCircuitBreakerFallback", commandProperties = {
@HystrixProperty(name = "circuitBreaker.enabled", value = "true"),
@HystrixProperty(name = "circuitBreaker.requestVolumeThreshold", value = "10"),
@HystrixProperty(name = "circuitBreaker.sleepWindowInMilliseconds", value = "10000"),
@HystrixProperty(name = "circuitBreaker.errorThresholdPercentage", value = "60")
})
public String paymentCircuitBreaker(Integer id) {
if (id < 0) {
//服务降级
throw new RuntimeException("id 不能是负数");
}
String serialNumber = IdUtil.simpleUUID();
return Thread.currentThread().getName() + " 调用成功,流水号:" + serialNumber;
}
public String paymentCircuitBreakerFallback(Integer id) {
return "id 不能为负数,请稍后重试,id:" + id;
}
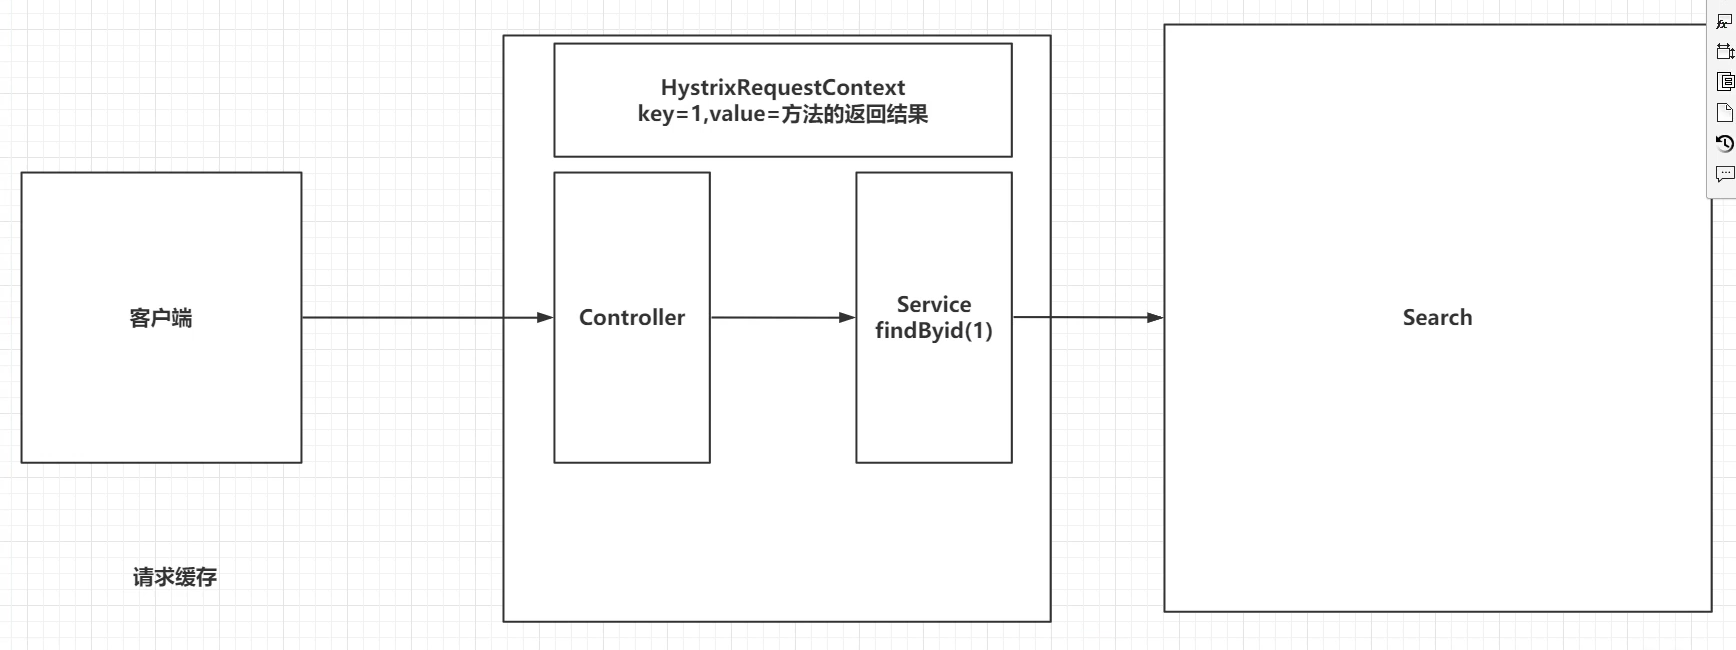
}请求缓存
- 请求缓存的生命周期是一次请求
- 缓存当前线程中的一个方法,将方法参数作为
key,方法的返回结果作为value - 在一次请求中,目标方法被调用过一次,以后就都会被缓存
常用配置
全局配置
hystrix:
  command: #用于控制HystrixCommand的行为
    default:
      execution:
        isolation:
          strategy:THREAD #控制HystrixCommand的隔离策略,THREAD->线程池隔离策略(默认),SEMAPHORE->信号量隔离策略
          thread:
            timeoutInMilliseconds:1000 #配置HystrixCommand执行的超时时间,执行超过该时间会进行服务降级处理
            interruptOnTimeout:true #配置HystrixCommand执行超时的时候是否要中断
            interruptOnCancel:true #配置HystrixCommand执行被取消的时候是否要中断
          timeout:
            enabled:true #配置HystrixCommand的执行是否启用超时时间
          semaphore:
            maxConcurrentRequests:10 #当使用信号量隔离策略时,用来控制并发量的大小,超过该并发量的请求会被拒绝
      fallback:
        enabled:true #用于控制是否启用服务降级
      circuitBreaker: #用于控制HystrixCircuitBreaker的行为
        enabled:true #用于控制断路器是否跟踪健康状况以及熔断请求
        requestVolumeThreshold:20 #超过该请求数的请求会被拒绝
        forceOpen:false #强制打开断路器,拒绝所有请求
        forceClosed:false #强制关闭断路器,接收所有请求
      requestCache:
        enabled:true #用于控制是否开启请求缓存
  collapser: #用于控制HystrixCollapser的执行行为
    default:
      maxRequestsInBatch:100 #控制一次合并请求合并的最大请求数
      timerDelayinMilliseconds:10 #控制多少毫秒内的请求会被合并成一个
      requestCache:
        enabled:true #控制合并请求是否开启缓存
  threadpool: #用于控制HystrixCommand执行所在线程池的行为
    default:
      coreSize:10 #线程池的核心线程数
      maximumSize:10 #线程池的最大线程数,超过该线程数的请求会被拒绝
      maxQueueSize:-1 #用于设置线程池的最大队列大小,-1采用SynchronousQueue,其他正数采用LinkedBlockingQueue
      queueSizeRejectionThreshold:5 #用于设置线程池队列的拒绝阀值,由于LinkedBlockingQueue不能动态改版大小,使用时需要用该参数来控制线程数
实例配置
实例配置只需要将全局配置中的 default 换成与之对应的 key 即可
hystrix:
  command:
    HystrixComandKey: # 将default换成HystrixComrnandKey
      execution:
        isolation:
          strategy:THREAD
  collapser:
    HystrixCollapserKey: # 将default换成HystrixCollapserKey
      maxRequestsInBatch:100
  threadpool:
    HystrixThreadPoolKey: # 将default换成HystrixThreadPoolKey
      coreSize:10
Zuul
Info
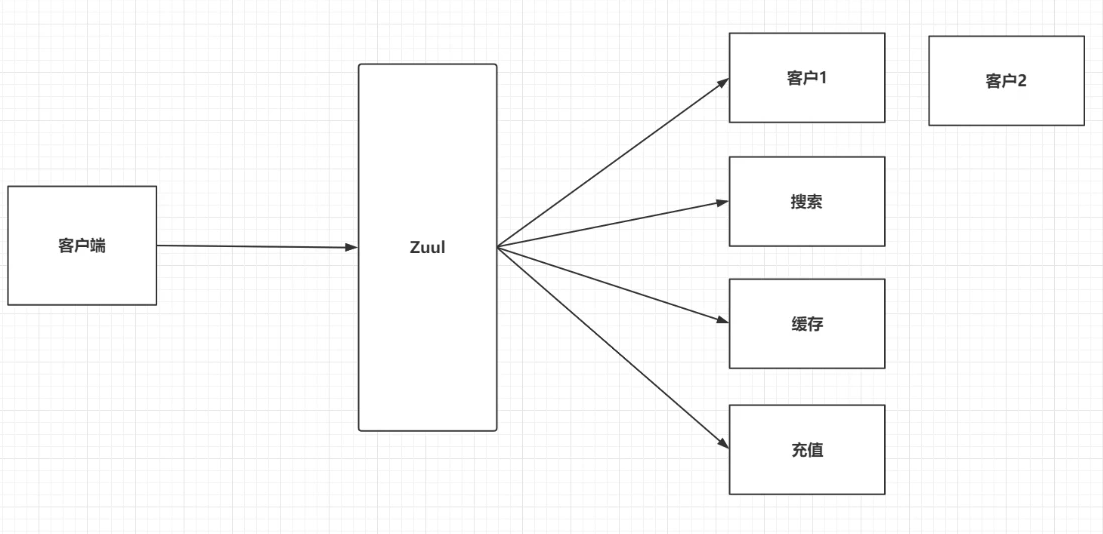
Zuul 解决了哪些痛点
1、客户端维护大量的 ip 和 port 信息
2、认证和授权操作, 需要在每一个模块中都添加认证和授权的操作
3、项目的迭代,服务要拆分,服务要合并,需要客户端进行大量的变化
4、统一的把安全性校验都放在 Zuul 中
快速搭建网关服务
pom
<!--zuul-->
<dependency>
    <groupId>org.springframework.cloud</groupId>
    <artifactId>spring-cloud-starter-netflix-zuul</artifactId>
</dependency>
<!--eureka-->
<dependency>
    <groupId>org.springframework.cloud</groupId>
    <artifactId>spring-cloud-starter-netflix-eureka-client</artifactId>
</dependency>
<dependency>
    <groupId>org.springframework.boot</groupId>
    <artifactId>spring-boot-starter-web</artifactId>
</dependency>
application.yml
server:
  port: 9001

spring:
  application:
    name: zuul

eureka:
  client:
    service-url:
      defaultZone: http://eureka7001.com:7001/eureka/,http://eureka7002.com:7002/eureka/

  instance:
    prefer-ip-address: true
启动类添加 @EnableZuulProxy 注解(据说这个版本的 @EnableZuulProxy 已经包含了 @EnableEurekaClient)
@EnableZuulProxy
@SpringBootApplication
public class ZuulApplication {
    public static void main(String[] args) {
        SpringApplication.run(ZuulApplication.class, args);
    }
}
路由
监控页面
查看路由规则的页面
pom
<dependency>
    <groupId>org.springframework.boot</groupId>
    <artifactId>spring-boot-starter-actuator</artifactId>
</dependency>
application.yml
# 查看 zuul 的监控页面(仅开发时用,生产环境不要添加该配置!)
management:
  endpoints:
    web:
      exposure:
        include: "routes"
访问 http://localhost:9001/actuator/routes
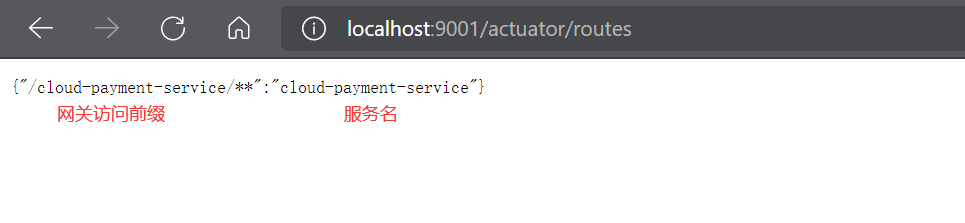
默认路由规则
Zuul 有一个默认路由规则:API 网关地址+访问的服务名称+接口 URI。如果想关闭它,配置如下:
zuul:
  ignored-services: cloud-payment-service,cloud-order-service #关闭默认路由配置
现在要访问 cloud-payment-service 的 /payment/get 接口:http://localhost:9001/cloud-payment-service/payment/get
cloud-payment-service 配置:
server:
  port: 8001
spring:
  application:
    name: cloud-payment-service
eureka:
  client:
    service-url:
      defaultZone: http://eureka7001.com:7001/eureka/,http://eureka7002.com:7002/eureka/
配置访问前缀
通过以下配置来给网关路径添加前缀,这个配置是全局生效的。此处添加了/proxy前缀,这样我们需要访问 http://localhost:9001/proxy/cloud-payment-service/payment/get 才能访问到 cloud-payment-service 中的接口
zuul:
  prefix:/proxy # 给网关路由添加前缀
忽略服务的配置
zuul:
  # 基于服务名忽略服务,监控页面无法查看;使用 "*" 忽略全部服务;无法忽略自定义路由配置
  ignored -services: eureka
  # 监控界面依然可以查看,在访问的时候 404
  ignored-patterns: /**/payment/**
自定义路由
zuul:
  # 基于服务名忽略服务,监控页面无法查看;使用 "*" 忽略全部服务;无法忽略自定义路由配置
  ignored -services: "*"
  # 监控界面依然可以查看,在访问的时候 404
  ignored-patterns: /**/payment/**
  # 自定义路由(方式一)
  routes:
    cloud-payment-service: /p/**
    #(方式二)
    zhifu:  #自定义名称
     path: /pp/**  #映射的路径
     serviceId: cloud-payment-service  #服务名称
灰度发布
添加一个配置类
@Bean
public PatternServiceRouteMapper serviceRouteMapper() {
return new PatternServiceRouteMapper(
"(?<name>^.+)-(?<version>v.+$)",
"${version}/${name}");
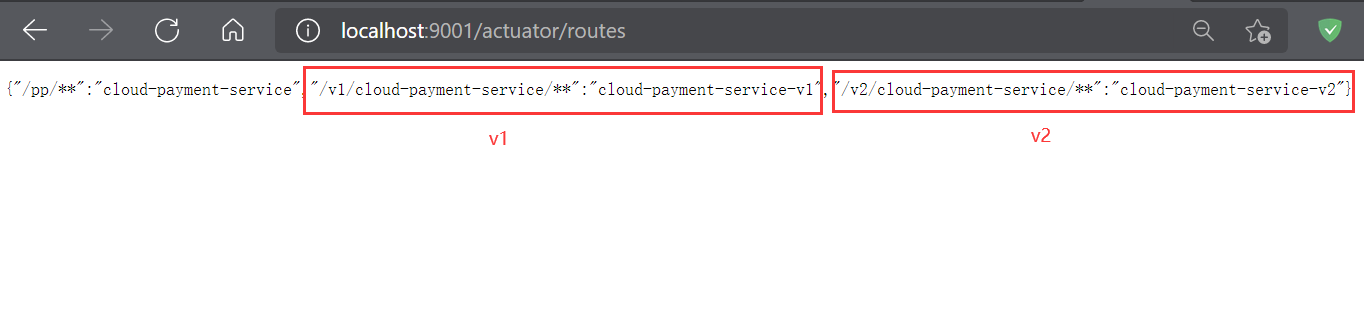
}准备一个服务,提供两个版本
v1 服务
version: v1

spring:
  application:
    name: cloud-payment-service-${version}
新增接口
@Value("${version}")
private String version;

@GetMapping("/version")
public String getVersion() {
    return version;
}
v2 服务
端口与版本不一样
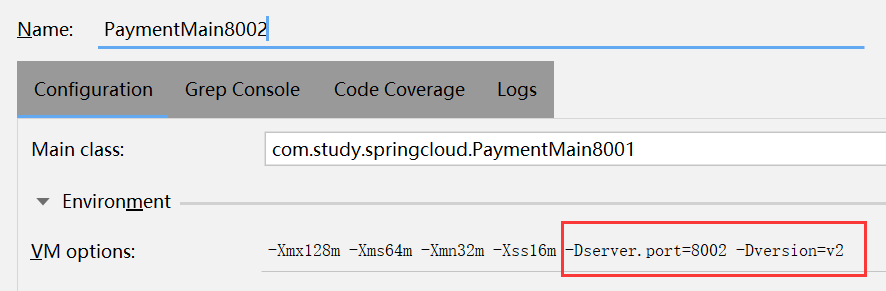
注意:网关不能配置 zuul.ignored -services: "*",否则路径会被忽略掉
在监控页面查看路由规则
过滤器
执行流程
客户端请求发送到 Zuul 服务上,首先通过 PreFilter 链, 如果正常放行,把请求再次转发给 RoutingFilter ,请求转发到一个指定的服务,在指定的服务响应一个结果之后, 再次走一个 PostFilter 的过滤器链, 最终将响应信息交给客户端。
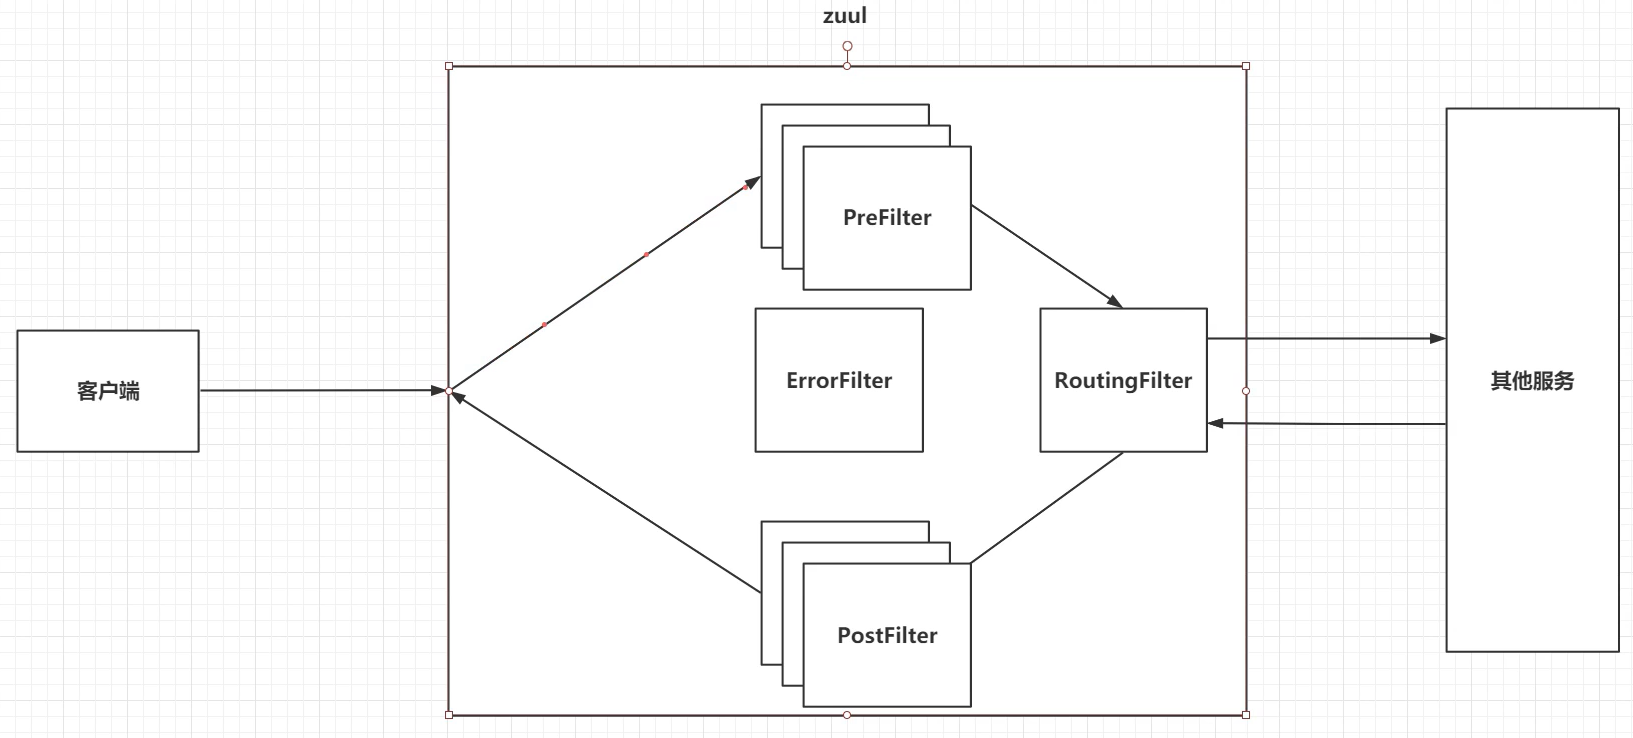
核心过滤器
| 过滤器名称 | 过滤类型 | 优先级 | 过滤器的作用 |
|---|---|---|---|
| ServletDetectionFilter | pre | -3 | 检测当前请求是通过 DispatcherServlet 处理运行的还是 ZuulServlet 运行处理的。 |
| Servlet30WrapperFilter | pre | -2 | 对原始的 HttpServletRequest 进行包装。 |
| FormBodyWrapperFilter | pre | -1 | 将 Content-Type 为 application/x-www-form-urlencoded 或 multipart/form-data 的请求包装成 FormBodyRequestWrapper 对象。 |
| DebugFilter | route | 1 | 根据 zuul.debug.request 的配置来决定是否打印 debug 日志。 |
| PreDecorationFilter | route | 5 | 对当前请求进行预处理以便执行后续操作。 |
| RibbonRoutingFilter | route | 10 | 通过 Ribbon 和 Hystrix 来向服务实例发起请求,并将请求结果进行返回。 |
| SimpleHostRoutingFilter | route | 100 | 只对请求上下文中有 routeHost 参数的进行处理,直接使用 HttpClient 向 routeHost 对应的物理地址进行转发。 |
| SendForwardFilter | route | 500 | 只对请求上下文中有 forward.to 参数的进行处理,进行本地跳转。 |
| SendErrorFilter | post | 0 | 当其他过滤器内部发生异常时会由它来进行处理,产生错误响应。 |
| SendResponseFilter | post | 1000 | 利用请求上下文的响应信息来组织请求成功后的响应内容。 |
禁用过滤器配置格式
zuul:
  filterClassName:
    filterType:
      disable:true
示例
zuul:
  PreLogFilter: #过滤器名称
    pre: #过滤器类型
      disable:true
自定义日志打印过滤器
创建 POJO 类,继承 ZuulFilter 类
@Component
public class PreLogFilter extends ZuulFilter {
private Logger LOGGER = LoggerFactory.getLogger(this.getClass());
/**
* 指定类型
* PRE_TYPE,ROUTE_TYPE,POST_TYPE,ERROR_TYPE
* @return
*/
@Override
public String filterType() {
return FilterConstants.PRE_TYPE;
}
/**
* 指定执行顺序,数值越小,优先级越高
* @return
*/
@Override
public int filterOrder() {
//在 preFilter 之前执行
return FilterConstants.PRE_DECORATION_FILTER_ORDER - 1;
}
/**
* 是否开启过滤器
* @return
*/
@Override
public boolean shouldFilter() {
return true;
}
/**
* 自定义的过滤器逻辑,打印日志
* @return
* @throws ZuulException
*/
@Override
public Object run() throws ZuulException {
RequestContext requestContext = RequestContext.getCurrentContext();
HttpServletRequest request = requestContext.getRequest();
String host = request.getRemoteHost();
String method = request.getMethod();
String uri = request.getRequestURI();
LOGGER.info("请求IP:{},请求Method:{},请求URI:{}", host, method, uri);
return null;
}
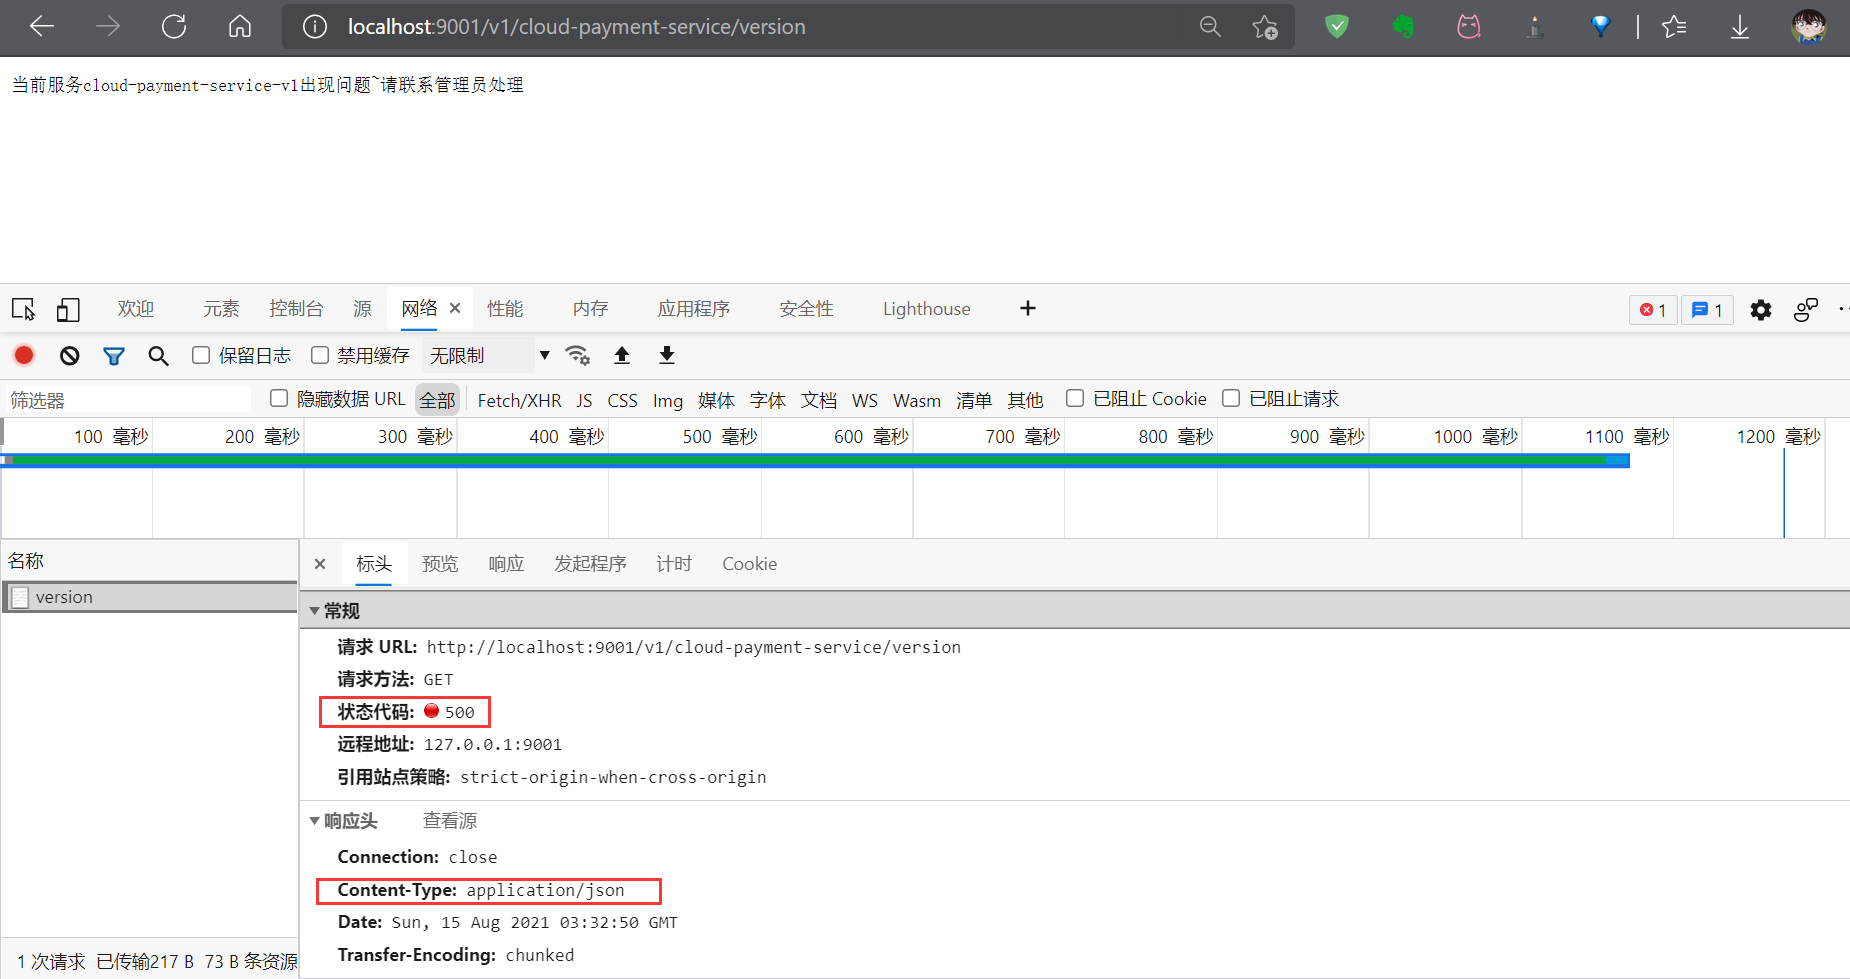
}降级
创建 POJO 类,实现 FallbackProvider 类
@Component
public class ZuulFallback implements FallbackProvider {
    private Logger LOGGER = LoggerFactory.getLogger(this.getClass());

    public ZuulFallback() {
        super();
    }

    @Override
    public String getRoute() {
        //指定全部出现问题的服务,都走这个降级方法
        return "*";
    }

    @Override
    public ClientHttpResponse fallbackResponse(String route, Throwable cause) {
        LOGGER.info("降级的服务{}", route);
        cause.printStackTrace();

        return new ClientHttpResponse() {
            @Override
            public HttpStatus getStatusCode() throws IOException {
                return HttpStatus.INTERNAL_SERVER_ERROR;
            }

            @Override
            public int getRawStatusCode() throws IOException {
                return HttpStatus.INTERNAL_SERVER_ERROR.value();
            }

            @Override
            public String getStatusText() throws IOException {
                return HttpStatus.INTERNAL_SERVER_ERROR.getReasonPhrase();
            }

            @Override
            public void close() {

            }

            @Override
            public InputStream getBody() throws IOException {
                //给客户端响应的信息
                String msg = "当前服务" + route + "出现问题~请联系管理员处理";
                return new ByteArrayInputStream(msg.getBytes());
            }

            @Override
            public HttpHeaders getHeaders() {
                //指定响应头信息
                HttpHeaders headers = new HttpHeaders();
                headers.setContentType(MediaType.APPLICATION_JSON);
                return headers;
            }
        };
    }
}
给 cloud-payment-service 服务的 /version 方法添加睡眠时间
@GetMapping("/version")
public String getVersion() throws InterruptedException {
    TimeUnit.SECONDS.sleep(3);
    return version;
}
访问 http://localhost:9001/v1/cloud-payment-service/version
动态路由
Info
常用配置
zuul:
  routes:#给服务配置路由
    user-service:
      path:/userService/**
    feign-service:
      path:/feignService/**
  ignored-services:user-service,feign-service#关闭默认路由配置
  prefix:/proxy#给网关路由添加前缀
  sensitive-headers:Cookie,Set-Cookie,Authorization#配置过滤敏感的请求头信息,设置为空就不会过滤
  add-host-header:true#设置为true重定向是会添加host请求头
  retryable:true# 关闭重试机制
  PreLogFilter:
    pre:
      disable:false#控制是否启用过滤器
Config
Sleuth
pom
<!--sleuth-->
<dependency>
    <groupId>org.springframework.cloud</groupId>
    <artifactId>spring-cloud-starter-sleuth</artifactId>
</dependency>
application.yml 指定 DispatcherServlet 的日志级别
logging:
  level:
    org.springframework.web.servlet.DispatcherServlet: debug
cloud-payment-service-v1:当前服务名称8831:总链路ID62e5:当前服务的链路IDfalse:不会将当前的日志信息,输出其他系统中
整合 Zipkin