Java 高并发中主要涉及到类位于
java.util.concurrent包中,简称 JUC,JUC 中大部分类都是依赖于 Unsafe 来实现的,主要用到了 Unsafe 中的 CAS、线程挂起、线程恢复等相关功能。
Callable 接口
@FunctionalInterface
public interface Callable<V> {
/**
* Computes a result, or throws an exception if unable to do so.
*
* @return computed result
* @throws Exception if unable to compute a result
*/
V call() throws Exception;
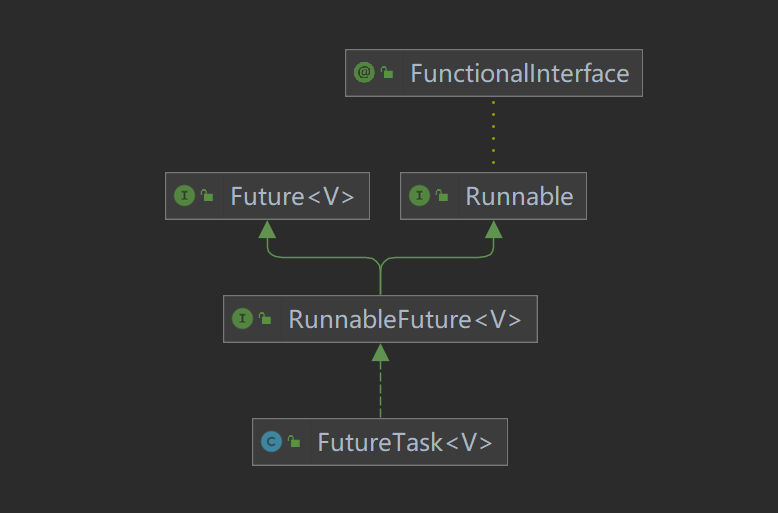
}Future 接口
Future 接口定义了操作异步异步任务执行一些方法,如获取异步任务的执行结果、取消任务的执行、判断任务是否被取消、判断任务执行是否完毕等。 get 方法会阻塞直到任务返回结果。
public interface Future<V> {

    // 取消在执行的任务,参数表示是否对执行的任务发送中断信号
    boolean cancel(boolean mayInterruptIfRunning);

    // 用来判断任务是否被取消
    boolean isCancelled();

    // 判断任务是否执行完毕
    boolean isDone();

    // 阻塞当前线程,直到任务返回结果
    V get() throws InterruptedException, ExecutionException;

    // 如果获取结果超时了,当前线程会被唤醒,继续执行其他任务
    V get(long timeout, TimeUnit unit)
        throws InterruptedException, ExecutionException, TimeoutException;
}
FutureTask 类
可取消的异步任务,提供 Future 的基础实现,并实现了 Runnable 接口。FutureTask 包含了取消与启动计算的方法,查询计算是否完成以及检索计算结果的方法。只有在计算完成才能检索到结果,调用 get() 方法时如果任务还没有完成将会阻塞调用线程至到任务完成。一旦计算完成就不能重新开始与取消计算,但可以调用 runAndReset() 重置状态后再重新计算。
3 种状态
- 未启动。FutureTask.run()方法还没有被执行之前,FutureTask 处于未启动状态。当创建一个 FutureTask,还没有执行 FutureTask.run()方法之前,FutureTask 处于未启动状态。
- 已启动。FutureTask.run()方法被执行的过程中,FutureTask 处于已启动状态。
- 已完成。FutureTask.run()方法执行结束,或者调用 FutureTask.cancel(…)方法取消任务,或者在执行任务期间抛出异常,这些情况都称之为 FutureTask 的已完成状态。
执行 FutureTask 的 get 方法和 cancel 方法时,当前处于不同的状态对应的结果也是大不相同
-
get 方法
- 当 FutureTask 处于未启动或已启动状态时,执行 FutureTask.get()方法将导致调用线程阻塞
- 如果 FutureTask 处于已完成状态,调用 FutureTask.get()方法将导致调用线程立即返回结果或者抛出异常
-
cancel 方法
- 当 FutureTask 处于未启动状态时,执行 FutureTask.cancel()方法将此任务永远不会执行;
- 当 FutureTask 处于已启动状态时,执行 FutureTask.cancel(true)方法将以中断线程的方式来阻止任务继续进行,如果执行 FutureTask.cancel(false)将不会对正在执行任务的线程有任何影响;
- 当 FutureTask 处于已完成状态时,执行 FutureTask.cancel(…)方法将返回 false。
API
public interface Future<V> {
    // 取消任务,如果任务正在运行的,mayInterruptIfRunning为true时,表明这个任务会被打断的,并返回true;
    // 为false时,会等待这个任务执行完,返回true;
    // 若任务还没执行,取消任务后返回true,如任务执行完,返回false
    boolean cancel(boolean mayInterruptIfRunning);
    // 判断任务是否被取消了,正常执行完不算被取消
    boolean isCancelled();
    // 判断任务是否已经执行完成,任务取消或发生异常也算是完成,返回true
    boolean isDone();
    // 获取任务返回结果,如果任务没有执行完成则等待完成将结果返回,
    // 如果获取的过程中发生异常就抛出异常,比如中断就会抛出InterruptedException异常等异常
    V get() throws InterruptedException, ExecutionException;
    // 在规定的时间如果没有返回结果就会抛出TimeoutException异常
    V get(long timeout, TimeUnit unit) throws InterruptedException, ExecutionException, TimeoutException;
}
构造方法
public FutureTask(Callable<V> callable) {
    if (callable == null)
        throw new NullPointerException();
    this.callable = callable;
    this.state = NEW;       // ensure visibility of callable
}
public FutureTask(Runnable runnable, V result) {
    this.callable = Executors.callable(runnable, result);
    this.state = NEW;       // ensure visibility of callable
}
state 状态值
 /** Possible state transitions:
 * NEW -> COMPLETING -> NORMAL
 * NEW -> COMPLETING -> EXCEPTIONAL
 * NEW -> CANCELLED
 * NEW -> INTERRUPTING -> INTERRUPTED
 */
private volatile int state;
//初始状态,还没有执行的,这个是在构造方法中进行赋值的
private static final int NEW          = 0;
//任务已经执行完成或者执行任务的时候发生异常,但是任务执行结果或者异常原因还没有
//保存到outcome字段(outcome字段用来保存任务执行结果,如果发生异常,则用来保存异常原因)的时候,
// 状态会从NEW变更到COMPLETING。但是这个状态会时间会比较短,属于中间状态
private static final int COMPLETING   = 1;
//任务正常执行完的最终状态
private static final int NORMAL       = 2;
//任务发生异常时的最终状态
private static final int EXCEPTIONAL  = 3;
//任务取消时的状态,任务取消当并不中断,即只调用了cancel(false)方法
private static final int CANCELLED    = 4;
//用户调用了cancel(true)方法取消任务,状态会从NEW转化为INTERRUPTING。这是一个中间状态。最终状态是INTERRUPTED
private static final int INTERRUPTING = 5;
//调用interrupt()中断任务,中断任务的最终状态
private static final int INTERRUPTED  = 6;
托管给线程处理
使用 Runnable 创建 FutureTask
FutureTask<String> task = new FutureTask<>(new Runnable() {
    @Override
    public void run() {
        System.out.println("do something...");
    }
}, "done");

new Thread(task).start();
boolean isDone = task.isDone();
String s = task.get();//这个方法会阻塞,直到任务完成时会返回
boolean done = task.isDone();
System.out.println("任务返回结果: " + s + " 完成状态:" + isDone + " " + done);
使用 Callable 创建 FutureTask
FutureTask<String> task = new FutureTask<>(new Callable<String>() {
    @Override
    public String call() throws Exception {
        System.out.println("dosometing...");
        return "done";
    }
});

new Thread(task).start();
boolean isDone = task.isDone();
String s = task.get();//这个方法会阻塞,直到任务完成时会返回
boolean done = task.isDone();
System.out.println("任务返回结果: " + s + " 完成状态:" + isDone + " " + done);
托管给线程池处理
Callable<String> task = () -> {
    System.out.println("dosometing...");
    return "done";
};

ExecutorService service = Executors.newSingleThreadExecutor();
Future<String> futureResult = service.submit(task);

boolean isDone = futureResult.isDone();
String s = futureResult.get();//这个方法会阻塞,直到任务完成时会返回
boolean done = futureResult.isDone();
service.shutdown();
System.out.println("任务返回结果: " + s + " 完成状态:" + isDone + " " + done);
LockSupport 类
LockSupport 中常用的方法
阻塞线程
- void park():阻塞当前线程,如果调用 unpark 方法或者当前线程被中断,从能从 park 方法中返回
- void park(Object blocker):功能同方法 1,入参增加一个对象,用来记录导致线程阻塞的阻塞对象,方便进行问题排查
- void parkNanos(long nanos):阻塞当前线程,最长不超过 nanos 纳秒,增加了超时返回的特性
- void parkNanos(Object blocker, long nanos):功能同方法 3,入参增加一个对象,用来记录导致线程阻塞的阻塞对象,方便进行问题排查
- void parkUntil(long deadline):阻塞当前线程,直到 deadline,deadline 是一个绝对时间,表示某个时间的毫秒格式
- void parkUntil(Object blocker, long deadline):功能同方法 5,入参增加一个对象,用来记录导致线程阻塞的阻塞对象,方便进行问题排查
唤醒线程
- void unpark(Thread thread):唤醒处于阻塞状态的指定线程
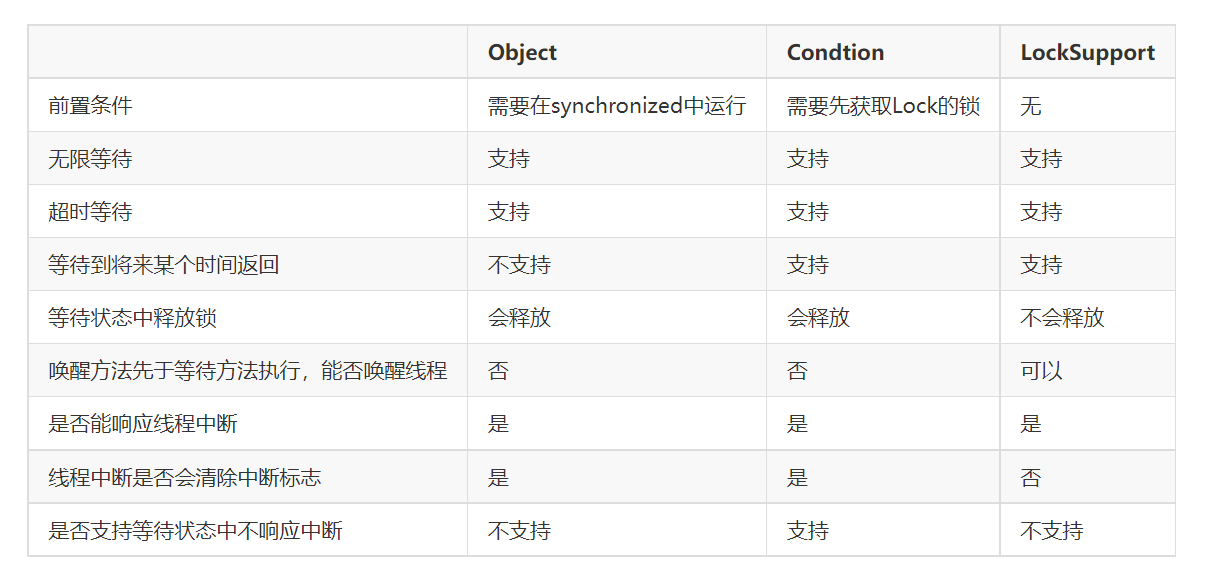
Object 和 Condition 的局限性
- 让线程等待和唤醒的方法能够执行的先决条件是:线程需要先获取锁
- 唤醒方法需要在等待方法之后调用,线程才能够被唤醒
关于这两点,LockSupport 都不需要,就能实现线程的等待和唤醒
LockSupport 的特点
- 唤醒的方法不管是在等待之前还是在等待之后调用,线程都能够被唤醒
- park 方法可以响应线程中断(interrupt 方法)
线程等待和唤醒的 3 种方式对比
- Object 中的 wait、notify、notifyAll 方法
- juc 中 Condition 接口提供的 await、signal、signalAll 方法
- juc 中的 LockSupport 提供的 park、unpark 方法
Semaphore(信号量)
作用:可以控制有多少个线程可以同时访问特定的资源,如果有业务场景需要进行流量控制,可以优先考虑 Semaphore。
常用方法
- Semaphore(int permits):构造方法,参数表示许可证数量,用来创建信号量(默认为非公平信号量,效率更高一些)
- Semaphore(int permits,boolean fair):构造方法,当 fair 等于 true 时,创建具有给定许可数的计数信号量并设置为公平信号量
- void acquire() throws InterruptedException:在此信号量获取 1 个许可前,线程将一直阻塞。此方法会响应线程中断,调用线程的 interrupt 方法,会使该方法抛出 InterruptedException 异常
- void acquire(int permits) throws InterruptedException :和 acquire() 方法类似,参数表示需要获取许可的数量;比如一个大卡车要入停车场,由于车比较大,需要申请 3 个车位才可以停放
- void acquireUninterruptibly(int permits) :和 acquire(int permits) 方法类似,只是不会响应线程中断
- boolean tryAcquire():尝试获取 1 个许可,不管是否能够获取成功,都立即返回,true 表示获取成功,false 表示获取失败
- boolean tryAcquire(int permits):和 tryAcquire() 类似,表示尝试获取 permits 个许可
- boolean tryAcquire(long timeout, TimeUnit unit) throws InterruptedException:在指定的时间内尝试获取 1 个许可,获取成功返回 true,指定的时间过后还是无法获取许可,返回 false
- boolean tryAcquire(int permits, long timeout, TimeUnit unit) throws InterruptedException:和 tryAcquire(long timeout, TimeUnit unit)类似,表示在指定的时间内尝试获取 permits 个许可
- void release():释放一个许可,将其返回给信号量,相当于车从停车场出去时将钥匙归还给门卫
- void release(int n):释放 n 个许可
- int availablePermits():当前可用的许可数
模拟场景:有一天,班主任需要班上 10 个同学到讲台上来填写一个表格,但是老师只准备了 5 支笔,因此,只能保证同时只有 5 个同学能够拿到笔并填写表格,没有获取到笔的同学只能够等前面的同学用完之后,才能拿到笔去填写表格。
public class SemaphoreDemo {
    // 表示有5支笔
    private static Semaphore semaphore = new Semaphore(5);
    //获取许可是否成功
    boolean acquireSuccess = false;

    public static void main(String[] args) {

        // 表示10个学生
        ExecutorService service = Executors.newFixedThreadPool(10);
        for (int i = 0; i < 10; i++) {
            service.execute(() -> {
                try {
                    System.out.println(Thread.currentThread().getName() + "  同学准备获取笔......");
                    // 获取许可
                    semaphore.acquire();
                    acquireSuccess = true;
                    System.out.println(Thread.currentThread().getName() + "  同学获取到笔");
                    System.out.println(Thread.currentThread().getName() + "  填写表格ing.....");
                    TimeUnit.SECONDS.sleep(3);
                } catch (InterruptedException e) {
                    e.printStackTrace();
                } finally {
                    if (acquireSuccess) {
                        // 释放许可
                        semaphore.release();
                        System.out.println(Thread.currentThread().getName() + "  填写完表格,归还了笔!!!!!!");
                    }
                }
            });
        }
        service.shutdown();
    }
}
线程获取许可后,最后必须释放许可,否则其他线程无法获取许可,会在 semaphore.acquire(); 处等待,导致程序无法结束。
CountDownLatch(闭锁)
使一个或一批线程在闭锁上等待,等到其他线程执行完相应操作后,闭锁打开,这些等待的线程才可以继续执行。(作用类似于 join)
常用方法
public CountDownLatch(int count):构造方法,count 表示计数器的值,不能小于 0,否者会报异常
public void await() throws InterruptedException:调用 await() 会让当前线程等待,直到计数器为 0 的时候,方法才会返回,此方法会响应线程中断操作。
public boolean await(long timeout, TimeUnit unit) throws InterruptedException:限时等待,在超时之前,计数器变为了 0,方法返回 true,否者直到超时,返回 false,此方法会响应线程中断操作
public void countDown():让计数器减 1
public long getCount():获取当前 CountDownLatch 维护的值
CountDownLatch 使用步骤
- 创建 CountDownLatch 对象
- 调用实例方法 await(),让当前线程等待
- 其他线程调用 countDown() 方法,让计数器减 1
- 当计数器变为 0 的时候,await() 方法会返回
赛跑案例
public class CountDownLatchDemo {
    // 裁判员的枪声
    private static CountDownLatch startSignal = new CountDownLatch(1);
    // 裁判员需要维护的是6个运动员
    private static CountDownLatch endSignal = new CountDownLatch(6);

    public static void main(String[] args) throws InterruptedException {
        ExecutorService executorService = Executors.newFixedThreadPool(6);
        for (int i = 0; i < 6; i++) {
            executorService.execute(() -> {
                try {
                    System.out.println(Thread.currentThread().getName() + " 运动员等待裁判员响哨!!!");
                    startSignal.await();
                    System.out.println(Thread.currentThread().getName() + "正在全力冲刺");
                    endSignal.countDown();
                    System.out.println(Thread.currentThread().getName() + "  到达终点");
                } catch (InterruptedException e) {
                    e.printStackTrace();
                }
            });
        }
        System.out.println("裁判员发号施令啦!!!");
        startSignal.countDown();
        endSignal.await();
        System.out.println("所有运动员到达终点,比赛结束!");
        executorService.shutdown();
    }
}
实现一个并行处理任务的工具类
import org.springframework.util.CollectionUtils;
import java.util.List;
import java.util.concurrent.CountDownLatch;
import java.util.concurrent.ExecutorService;
import java.util.concurrent.Executors;
import java.util.concurrent.TimeUnit;
import java.util.function.Consumer;
import java.util.stream.Collectors;
import java.util.stream.Stream;

public class TaskDisposeUtils {
    //并行线程数
    public static final int POOL_SIZE;
    static {
        POOL_SIZE = Integer.max(Runtime.getRuntime().availableProcessors(), 5);
    }
    /**
     * 并行处理,并等待结束
     *
     * @param taskList 任务列表
     * @param consumer 消费者
     * @param <T>
     * @throws InterruptedException
     */
    public static <T> void dispose(List<T> taskList, Consumer<T> consumer) throws InterruptedException {
        dispose(true, POOL_SIZE, taskList, consumer);
    }
    /**
     * 并行处理,并等待结束
     *
     * @param moreThread 是否多线程执行
     * @param poolSize   线程池大小
     * @param taskList   任务列表
     * @param consumer   消费者
     * @param <T>
     * @throws InterruptedException
     */
    public static <T> void dispose(boolean moreThread, int poolSize, List<T> taskList, Consumer<T> consumer) throws InterruptedException {
        if (CollectionUtils.isEmpty(taskList)) {
            return;
        }
        if (moreThread && poolSize > 1) {
            poolSize = Math.min(poolSize, taskList.size());
            ExecutorService executorService = null;
            try {
                executorService = Executors.newFixedThreadPool(poolSize);
                CountDownLatch countDownLatch = new CountDownLatch(taskList.size());
                for (T item : taskList) {
                    executorService.execute(() -> {
                        try {
                            consumer.accept(item);
                        } finally {
                            countDownLatch.countDown();
                        }
                    });
                }
                countDownLatch.await();
            } finally {
                if (executorService != null) {
                    executorService.shutdown();
                }
            }
        } else {
            for (T item : taskList) {
                consumer.accept(item);
            }
        }
    }
    public static void main(String[] args) throws InterruptedException {
        //生成1-10的10个数字,放在list中,相当于10个任务
        List<Integer> list = Stream.iterate(1, a -> a + 1).limit(10).collect(Collectors.toList());
        //启动多线程处理list中的数据,每个任务休眠时间为list中的数值
        TaskDisposeUtils.dispose(list, item -> {
            try {
                long startTime = System.currentTimeMillis();
                TimeUnit.SECONDS.sleep(item);
                long endTime = System.currentTimeMillis();
                System.out.println(System.currentTimeMillis() + ",任务" + item + "执行完毕,耗时:" + (endTime - startTime));
            } catch (InterruptedException e) {
                e.printStackTrace();
            }
        });
        //上面所有任务处理完毕完毕之后,程序才能继续
        System.out.println(list + "中的任务都处理完毕!");
    }
}
TaskDisposeUtils 是一个并行处理的工具类,可以传入 n 个任务内部使用线程池进行处理,等待所有任务都处理完成之后,方法才会返回。比如我们发送短信,系统中有 1 万条短信,我们使用上面的工具,每次取 100 条并行发送,待 100 个都处理完毕之后,再取一批按照同样的逻辑发送。
CyclicBarrier(循环屏障)
它和 CountDownLatch 很相似,都可以使线程先等待然后再执行。不过 CountDownLatch 是使一批线程等待另一批线程执行完后再执行;而 CyclicBarrier 只是使等待的线程达到一定数目后再让它们继续执行。
每调用一次 await()方法都将使阻塞的线程数+1,只有阻塞的线程数达到设定值时屏障才会打开,允许阻塞的所有线程继续执行。
CyclicBarrier 的计数器可以重置而 CountDownLatch 不行,这意味着 CyclicBarrier 实例可以被重复使用,而 CountDownLatch 只能被使用一次。而这也是循环屏障循环二字的语义所在。
CyclicBarrier 允许用户自定义 barrierAction 操作,这是个可选操作,可以在创建 CyclicBarrier 对象时指定。
public CyclicBarrier(int parties, Runnable barrierAction) {
    if (parties <= 0) throw new IllegalArgumentException();
    this.parties = parties;
    this.count = parties;
    this.barrierCommand = barrierAction;
}
await() 可以设置等待超时
public int await(long timeout, TimeUnit unit) throws InterruptedException,BrokenBarrierException,TimeoutException示例:模拟赛跑
public class CyclicBarrierDemo {
    //指定必须有6个运动员到达才行
    private static CyclicBarrier barrier = new CyclicBarrier(6, () -> {
        System.out.println("所有运动员入场,裁判员一声令下!!!!!");
    });
    public static void main(String[] args) {
        System.out.println("运动员准备进场,全场欢呼............");
        ExecutorService service = Executors.newFixedThreadPool(6);
        for (int i = 0; i < 6; i++) {
            service.execute(() -> {
                try {
                    System.out.println(Thread.currentThread().getName() + " 运动员,进场");
                    barrier.await();
                    System.out.println(Thread.currentThread().getName() + "  运动员出发");
                } catch (InterruptedException e) {
                    e.printStackTrace();
                } catch (BrokenBarrierException e) {
                    e.printStackTrace();
                }
            });
        }
    }
}
输出
运动员准备进场,全场欢呼............
pool-1-thread-2 运动员,进场
pool-1-thread-1 运动员,进场
pool-1-thread-3 运动员,进场
pool-1-thread-4 运动员,进场
pool-1-thread-5 运动员,进场
pool-1-thread-6 运动员,进场
所有运动员入场,裁判员一声令下!!!!!
pool-1-thread-6 运动员出发
pool-1-thread-1 运动员出发
pool-1-thread-5 运动员出发
pool-1-thread-4 运动员出发
pool-1-thread-3 运动员出发
pool-1-thread-2 运动员出发
从输出结果可以看出,当 6 个运动员(线程)都到达了指定的临界点(barrier)时候,裁判发出指令,才能继续往下执行,否则,则会阻塞等待在调用 await() 处。
注意:
- 内部有一个人把规则破坏了,比如接收到中断信号(或等待超时),其他人都不按规则来了,不会等待了
- 接收到中断信号(或等待超时)的线程,await 方法会触发 InterruptedException (或 TimeoutException)异常,然后被唤醒向下运行
- 其他等待中或者后面到达的线程,会在 await 方法上触发 BrokenBarrierException 异常,然后继续执行
- 规则被打乱了,可以使用 cyclicBarrier.reset() 重建规则
CountDownLatch 与 CyclicBarrier 的比较
CountDownLatch 与 CyclicBarrier 都是用于控制并发的工具类,都可以理解成维护的就是一个计数器,但是这两者还是各有不同侧重点的:
-
CountDownLatch 一般用于某个线程 A 等待若干个其他线程执行完任务之后,它才执行;而 CyclicBarrier 一般用于一组线程互相等待至某个状态,然后这一组线程再同时执行;CountDownLatch 强调一个线程等多个线程完成某件事情。CyclicBarrier 是多个线程互等,等大家都完成,再携手共进。
-
调用 CountDownLatch 的 countDown 方法后,当前线程并不会阻塞,会继续往下执行;而调用 CyclicBarrier 的 await 方法,会阻塞当前线程,直到 CyclicBarrier 指定的线程全部都到达了指定点的时候,才能继续往下执行;
-
CountDownLatch 方法比较少,操作比较简单,而 CyclicBarrier 提供的方法更多,比如能够通过 getNumberWaiting(),isBroken() 这些方法获取当前多个线程的状态,并且 CyclicBarrier 的构造方法可以传入 barrierAction,指定当所有线程都到达时执行的业务功能;
-
CountDownLatch 是不能复用的,而 CyclicBarrier 是可以复用的。
-
CountDownLatch 会阻塞主线程,CyclicBarrier 不会阻塞主线程,只会阻塞子线程
Executor 家族
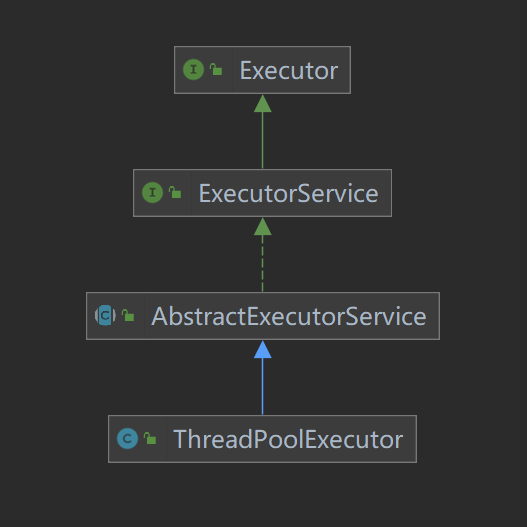
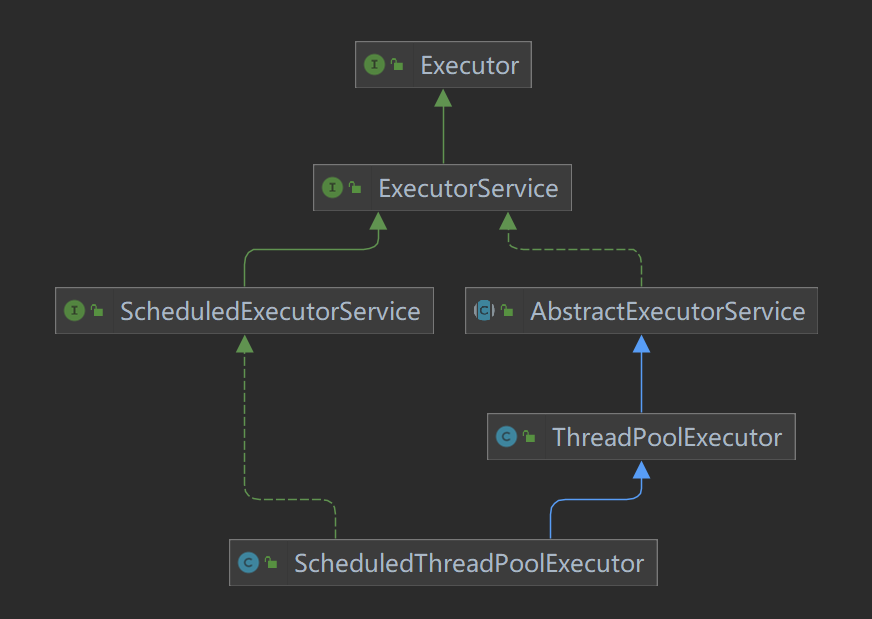
Executor 接口
Executor 接口中定义了方法 execute(Runable able) 接口,该方法接受一个 Runable 实例,他来执行一个任务,任务即实现一个 Runable 接口的类。
public interface Executor {

    /**
     * Executes the given command at some time in the future.  The command
     * may execute in a new thread, in a pooled thread, or in the calling
     * thread, at the discretion of the {@code Executor} implementation.
     *
     * @param command the runnable task
     * @throws RejectedExecutionException if this task cannot be
     * accepted for execution
     * @throws NullPointerException if command is null
     */
    void execute(Runnable command);
}
ExecutorService 接口
Executor 的子接口,代表尽快执行线程的线程池(只要线程池中有空闲线程,就立即执行线程任务)
主要方法:
- void execute(Runnable command):在未来某个时间执行给定的命令
- Future
<?>submit(Runnable task):将一个 Runnable 对象提交给指定的线程池,线程池将在有空闲线程时执行 Runnable 对象代表的任务,其中 Future 对象代表 Runnable 任务的返回值——但 run () 方法没有返回值,所以 Future 对象将在 run() 方法执行结束后返回 null,但可以调用 Future 的 isDone()、isCancelled() 方法来获得 Runnable 对象的执行状态 <T>Future<T>submit(Runnable task, T result):将一个 Runnable 对象提交给指定的线程池,线程池将在有空闲线程时执行 Runnable 对象代表的任务,其中 result 显式指定线程执行结束后的返回值,所以 Future 对象将在 run() 方法执行结束后返回 result- Future
<T>submit(Callable<T>task):将一个 Callable 对象提交给指定的线程池,线程池将在有空闲线程时执行 Callable 对象代表的任务,其中 Future 代表 Callable 对象里 call() 方法的返回值 - List
<Future<T>>invokeAll(Collection<? extends Callable<T>>tasks):执行给定的任务,当所有任务完成时,返回保持任务状态和结果的 Future 列表 - T invokeAny(Collection
<? extends Callable<T>>tasks):执行给定的任务,如果某个任务已成功完成(也就是未抛出异常),则返回其结果 - void shutdown():关闭启动的线程池,调用该方法后的线程池不再接收新任务,但会将以前所有已提交任务执行完成,当线程池中的所有任务都执行完成后,池中的所有线程都会死亡
- List
<Runnable>shutdownNow():试图停止所有正在执行的活动任务,暂停处理正在等待的任务,并返回等待执行的任务列表
ScheduledExecutorService 接口
ExecutorService 的子接口,代表可在指定延迟后或周期性地执行线程任务的线程池
主要方法:
- ScheduledFuture
<V>schedule(Callable<V>callable, long delay, TimeUnit unit):指定 callable 任务将在 delay 延迟后执行 - ScheduledFuture
<?>schedule(Runnable command, long delay, TimeUnit unit):指定 command 任务将在 delay 延迟后执行 - ScheduledFuture
<?>scheduleAtFixedRate(Runnable command, long initialDelay, long period, TimeUnit unit):指定 command 任务将在 delay 延迟后执行,而且以设定频率重复执行(在 initialDelay 后开始执行,依次在 initialDelay+period、initialDelay+2*period… 处重复执行) - ScheduledFuture
<?>scheduleWithFixedDelay(Runnable command, long initialDelay, long delay, TimeUnit unit):创建并执行一个在给定初始延迟后首次启用的定期操作,随后在每一次执行终止和下一次执行开始之间都存在给定的延迟(如果任务在任一次执行时遇到异常,就会取消后续执行;否则,只能通过程序来显式取消或终止该任务)
ThreadPoolExecutor 类
线程池的实现类
ScheduledThreadPoolExecutor 类
-
继承了 ThreadPoolExecutor,拥有 execute() 和 submit() 提交异步任务的基础功能。
-
实现了 ScheduledExecutorService,该接口定义了 ScheduledThreadPoolExecutor 能够延时执行任务和周期执行任务的功能。
-
有两个内部类
- ScheduledFutureTask:可以延迟执行的异步运算任务
- DelayedWorkQueue:存储周期或延迟任务的延迟队列
 线程池之 ScheduledThreadPoolExecutor
构造方法
public ScheduledThreadPoolExecutor(int corePoolSize) {
    super(corePoolSize, Integer.MAX_VALUE, 0, NANOSECONDS,
          new DelayedWorkQueue());
};
public ScheduledThreadPoolExecutor(int corePoolSize,
                                   ThreadFactory threadFactory) {
    super(corePoolSize, Integer.MAX_VALUE, 0, NANOSECONDS,
          new DelayedWorkQueue(), threadFactory);
};
public ScheduledThreadPoolExecutor(int corePoolSize,
                                   RejectedExecutionHandler handler) {
    super(corePoolSize, Integer.MAX_VALUE, 0, NANOSECONDS,
          new DelayedWorkQueue(), handler);
};
public ScheduledThreadPoolExecutor(int corePoolSize,
                                   ThreadFactory threadFactory,
                                   RejectedExecutionHandler handler) {
    super(corePoolSize, Integer.MAX_VALUE, 0, NANOSECONDS,
          new DelayedWorkQueue(), threadFactory, handler);
}
API
//延迟delay后执行任务,这里传入的是实现Runnable接口的任务
//因此ScheduledFuture.get()获取结果为null
public ScheduledFuture<?> schedule(Runnable command,
                                       long delay, TimeUnit unit);

//延迟delay后执行任务,这里传入的是实现Callable接口的任务
//因此ScheduledFuture.get()获取结果是任务的最终计算结果
 public <V> ScheduledFuture<V> schedule(Callable<V> callable,
                                           long delay, TimeUnit unit);

//创建一个周期执行的任务,第一次执行延期时间为initialDelay
//之后每隔period执行一次,不等待上一次执行完就开始计时
//检测上一个任务是否执行完毕,如果上一个任务执行完毕,则当前任务立即执行
//如果上一个任务没有执行完毕,则需要等上一个任务执行完毕后立即执行
public ScheduledFuture<?> scheduleAtFixedRate(Runnable command,
                                                  long initialDelay,
                                                  long period,
                                                  TimeUnit unit);

//创建一个周期执行的任务,第一次执行延期时间为initialDelay,
//在第一次执行完之后延迟delay后开始下一次执行
public ScheduledFuture<?> scheduleWithFixedDelay(Runnable command,
                                                     long initialDelay,
                                                     long delay,
                                                     TimeUnit unit);
scheduleAtFixedRate 示例
public static void main(String[] args) {

    ScheduledExecutorService service = Executors.newScheduledThreadPool(10);

    final long[] t1 = {System.currentTimeMillis()};

    Runnable task = ()->{
        try {
            long start = System.currentTimeMillis();
            long t2 = start - t1[0];
            System.out.println("距离上一个任务开始执行,过了 " + t2 + " ms");
            t1[0] = start;

            TimeUnit.SECONDS.sleep(1);
            long time = System.currentTimeMillis() - start;
            System.out.println(Thread.currentThread().getName() + "执行完毕,用时:" + time + " ms");
        } catch (InterruptedException e) {
            e.printStackTrace();
        }
    };

    ScheduledFuture<?> future = service.scheduleAtFixedRate(task, 0, 2, TimeUnit.SECONDS);
    TimeUnit.SECONDS.sleep(60);
    // 取消执行任务
    future.cancel(false);
    // 关闭线程池
    service.shutdown();
    System.out.println("任务是否被取消:" + future.isCancelled());
    System.out.println("任务是否已完成:" + future.isDone());
}
执行时间=1 秒
 执行时间=5 秒
从结果可以看到
如果上一次执行时间<delay,则上一次任务开始执行后+delay,开始执行下一次任务
如果上一次执行时间>delay,则上一次任务执行结束后,立即执行下一次任务
scheduleWithFixedDelay 示例
public static void main(String[] args) {

    ScheduledExecutorService service = Executors.newScheduledThreadPool(10);

    final long[] t1 = {System.currentTimeMillis()};

    Runnable task = ()->{
        try {
            long start = System.currentTimeMillis();
            long t2 = start - t1[0];
            System.out.println("距离上一个任务开始执行,过了 " + t2 + " ms");
            t1[0] = start;

            TimeUnit.SECONDS.sleep(1);
            long time = System.currentTimeMillis() - start;
            System.out.println(Thread.currentThread().getName() + "执行完毕,用时:" + time + " ms");
        } catch (InterruptedException e) {
            e.printStackTrace();
        }
    };

    ScheduledFuture<?> future = service.scheduleWithFixedDelay(task, 0, 2, TimeUnit.SECONDS);
    TimeUnit.SECONDS.sleep(60);
    // 取消执行任务
    future.cancel(false);
    // 关闭线程池
    service.shutdown();
    System.out.println("任务是否被取消:" + future.isCancelled());
    System.out.println("任务是否已完成:" + future.isDone());
}
执行时间=1 秒
 从结果可以看到,上一次任务执行结束后+delay,开始执行下一次任务
线程池
为什么要使用线程池 / 使用线程池有什么好处
-
降低资源消耗。通过复用已存在的线程和降低线程关闭的次数来尽可能降低系统性能损耗;
-
提升系统响应速度。通过复用线程,省去创建线程的过程,因此整体上提升了系统的响应速度;
-
提高线程的可管理性。线程是稀缺资源,如果无限制的创建,不仅会消耗系统资源,还会降低系统的稳定性,因此,需要使用线程池来管理线程。
线程池实现原理
-
判断是否达到核心线程数,若未达到,则直接创建新的线程处理当前传入的任务,否则进入下个流程
-
线程池中的工作队列是否已满,若未满,则将任务丢入工作队列中先存着等待处理,否则进入下个流程
-
是否达到最大线程数,若未达到,则创建新的线程处理当前传入的任务,否则交给线程池中的饱和策略进行处理
线程池的创建
public ThreadPoolExecutor(int corePoolSize,
                          int maximumPoolSize,
                          long keepAliveTime,
                          TimeUnit unit,
                          BlockingQueue<Runnable> workQueue,
                          ThreadFactory threadFactory,
RejectedExecutionHandler handler)corePoolSize:核心线程大小,当提交一个任务到线程池时,线程池会创建一个线程来执行任务,即使有其他空闲线程可以处理任务也会创新线程,等到工作的线程数大于核心线程数时就不会在创建了。如果调用了 prestartCoreThread() 或者 prestartAllCoreThreads(),线程池创建的时候所有的核心线程都会被创建并且启动
maximumPoolSize:线程池允许创建的最大线程数。如果队列满了,并且以创建的线程数小于最大线程数,则线程池会再创建新的线程执行任务。如果我们使用了无界队列,那么所有的任务会加入队列,这个参数就没有什么效果了
keepAliveTime:线程池的工作线程空闲后,保持存活的时间。如果没有任务处理了,有些线程会空闲,空闲的时间超过了这个值,会被回收掉。如果任务很多,并且每个任务的执行时间比较短,避免线程重复创建和回收,可以调大这个时间,提高线程的利用率
unit:keepAliveTIme 的时间单位,可以选择的单位有天、小时、分钟、毫秒、微妙、千分之一毫秒和纳秒。类型是一个枚举 java.util.concurrent.TimeUnit
workQueue:工作队列,用于缓存待处理任务的阻塞队列,常见的有 4 种:ArrayBlockingQueue, LinkedBlockingQueue, SynchronousQueue, PriorityBlockingQueue
threadFactory:线程池中创建线程的工厂,可以通过线程工厂给每个创建出来的线程设置更有意义的名字
handler:饱和策略,当线程池无法处理新来的任务了,那么需要提供一种策略处理提交的新任务,默认有 4 种策略:
- AbortPolicy: 直接拒绝所提交的任务,并抛出 RejectedExecutionException 异常;
- CallerRunsPolicy:在当前调用者的线程中运行任务,即谁丢来的任务,由它自己去处理;
- DiscardPolicy:不处理直接丢弃掉任务;
- DiscardOldestPolicy:丢弃掉阻塞队列中存放时间最久的任务,执行当前任务。
简单使用
// 创建线程池
ThreadPoolExecutor executor = new ThreadPoolExecutor(3,
            5,
            10,
            TimeUnit.SECONDS,
            new ArrayBlockingQueue<Runnable>(10),
            Executors.defaultThreadFactory(),
            new ThreadPoolExecutor.AbortPolicy());

// 执行任务
for (int i = 0; i < 10; i++) {
    final int j = i;
    executor.execute(() -> {
        System.out.println(Thread.currentThread().getName() + j + "处理完毕");
    });
}

//关闭线程池
executor.shutdown();
execute 方法执行逻辑有这样几种情况:
- 如果当前运行的线程少于 corePoolSize,则会创建新的线程来执行新的任务;
- 如果运行的线程个数等于或者大于 corePoolSize,则会将提交的任务存放到阻塞队列 workQueue 中;
- 如果当前 workQueue 队列已满的话,则会创建新的线程来执行任务;
- 如果线程个数已经超过了 maximumPoolSize,则会使用饱和策略 RejectedExecutionHandler 来进行处理。
线程池的关闭
关闭线程池,可以通过 shutdown 和 shutdownNow 这两个方法。它们的原理都是遍历线程池中所有的线程,然后依次中断线程。shutdown 和 shutdownNow 还是有不一样的地方:
- shutdownNow 首先将线程池的状态设置为 STOP ,然后尝试停止所有的正在执行和未执行任务的线程,并返回等待执行任务的列表;
- shutdown 只是将线程池的状态设置为 SHUTDOWN 状态,然后中断所有没有正在执行任务的线程。
可以看出 shutdown 方法会将正在执行的任务继续执行完,而 shutdownNow 会直接中断正在执行的任务。调用了这两个方法的任意一个,isShutdown 方法都会返回 true,当所有的线程都关闭成功,才表示线程池成功关闭,这时调用 isTerminated 方法才会返回 true。
Executors 工具类
创建线程池的静态方法
- ExecutorService newCachedThreadPool():创建一个具有缓存功能的无界线程池,系统根据需要创建线程,线程空闲时会被缓存在线程池中。如果线程 60 秒未被使用,将会被终止并从缓存中移除。
- 无界线程池(线程数上限是 Integer.MAX_VALUE),如果需要处理的任务比较耗时,会导致新来的任务都会创建新的线程进行处理,可能会导致创建非常多的线程,最终耗尽系统资源,触发 OOM。
new ThreadPoolExecutor(0,
                    Integer.MAX_VALUE,
                    60L,
                    TimeUnit.SECONDS,
new SynchronousQueue<Runnable>())- ExecutorService newFixedThreadPool(int nThreads):创建一个可重用的、具有固定核心线程数的线程池。
- 内部使用了无限容量的 LinkedBlockingQueue 阻塞队列来缓存任务,任务如果比较多,如果处理不过来,会导致队列堆满,引发 OOM。
new ThreadPoolExecutor(nThreads,
                        nThreads,
                        0L,
                        TimeUnit.MILLISECONDS,
new LinkedBlockingQueue<Runnable>())- ExecutorService newSingleThreadExecutor():创建一个只有单线程的线程池,任务按照顺序执行。如果这个唯一的线程因为异常结束,那么会有一个新的线程来替代它。
- 此线程池保证所有任务的执行顺序按照任务的提交顺序执行。内部使用了无限容量的 LinkedBlockingQueue 阻塞队列来缓存任务,任务如果比较多,单线程如果处理不过来,会导致队列堆满,引发 OOM。
new ThreadPoolExecutor(1,
                    1,
                    0L,
                    TimeUnit.MILLISECONDS,
new LinkedBlockingQueue<Runnable>())- ScheduledExecutorService newScheduledThreadPool(int corePoolSize):创建一个大小无限的线程池。此线程池支持定时以及周期性执行任务的需求。
new ThreadPoolExecutor(corePoolSize,
                        Integer.MAX_VALUE,
                        10L,
                        MILLI_SCALE,
                        new DelayedWorkQueue())
ScheduledExecutorService#schedule()
ScheduledFuture 5 秒后执行
@Slf4j
public class ScheduleTest {

    public static void main(String[] args) {
       log.info("准备执行任务");
        Queue<String> queue=new ConcurrentLinkedDeque<>();
        List<String> taskList= Lists.newArrayList("1号","2号","5号","7号");
        queue.addAll(taskList);

        ScheduledExecutorService pool= Executors.newScheduledThreadPool(1);
        for(int i=0;i<queue.size();i++) {
            ScheduledFuture<String> future = pool.schedule(new Callable<String>() {
                @Override
                public String call() throws InterruptedException {
                    log.info(Thread.currentThread().getName() + " "+System.currentTimeMillis()+"当前执行的任务是" + queue.poll());
                    TimeUnit.SECONDS.sleep(2);
                    return "callSchedule";
                }
            }, 5, TimeUnit.SECONDS);
        }
    }
}
关于 ScheduledExecutorService 的更多方法
线程池中常见的阻塞队列
阻塞队列(BlockingQueue)被广泛使用在“生产者-消费者”问题中,其原因是 BlockingQueue 提供了可阻塞的插入和移除的方法。当队列容器已满,生产者线程会被阻塞,直到队列未满;当队列容器为空时,消费者线程会被阻塞,直至队列非空时为止。
ArrayBlockingQueue
- 一个基于数组结构的有界阻塞队列,此队列按照 FIFO(先进先出)原则对元素进行排序。
- 如果需要获得公平性的 ArrayBlockingQueue,可采用如下代码,但这样会降低吞吐量。
private static ArrayBlockingQueue<Integer> blockingQueue
                                = new ArrayBlockingQueue<Integer>(10,true);
LinkedBlockingQueue
- 一个基于链表结构的阻塞队列,此队列按照 FIFO(先进先出)排序元素,吞吐量通常要高于 ArrayBlockingQueue。静态工厂方法 Executors.newFixedThreadPool 使用了这个队列。
- 为了防止 LinkedBlockingQueue 容量迅速增大,损耗大量内存。通常在创建 LinkedBlockingQueue 对象时,会指定其大小,如果未指定,容量等于 Integer.MAX_VALUE。
SynchronousQueue
- 一个不存储元素的阻塞队列,每个插入操作必须等到另外一个线程调用移除操作,否则插入操作一直处理阻塞状态,吞吐量通常要高于 LinkedBlockingQueue,静态工厂方法 Executors.newCachedThreadPool 使用这个队列。
- 可以通过构造器参数来为其指定公平性。
PriorityBlockingQueue
- 一个支持优先级的无界阻塞队列。默认情况下元素采用自然顺序进行排序,也可以通过自定义类实现 compareTo()方法来指定元素排序规则,或者初始化时通过构造器参数 Comparator 来指定排序规则。
LinkedTransferQueue
-
一个由链表数据结构构成的无界阻塞队列,由于该队列实现了 TransferQueue 接口,与其他阻塞队列相比主要有以下不同的方法:
- transfer(E e) 如果当前有线程(消费者)正在调用 take()方法或者可延时的 poll()方法进行消费数据时,生产者线程可以调用 transfer 方法将数据传递给消费者线程。如果当前没有消费者线程的话,生产者线程就会将数据插入到队尾,直到有消费者能够进行消费才能退出
- tryTransfer(E e) 如果当前有消费者线程(调用 take 方法或者具有超时特性的 poll 方法)正在消费数据的话,该方法可以将数据立即传送给消费者线程,如果当前没有消费者线程消费数据的话,就立即返回 false。因此,与 transfer 方法相比,transfer 方法是必须等到有消费者线程消费数据时,生产者线程才能够返回。而 tryTransfer 方法能够立即返回结果退出。
- tryTransfer(E e,long timeout,imeUnit unit) 与 transfer 基本功能一样,只是增加了超时特性,如果数据才规定的超时时间内没有消费者进行消费的话,就返回 false。
LinkedBlockingDeque
- 基于链表数据结构的有界阻塞双端队列,如果在创建对象时为指定大小时,其默认大小为 Integer.MAX_VALUE。与 LinkedBlockingQueue 相比,主要的不同点在于,LinkedBlockingDeque 具有双端队列的特性。
DelayQueue
- 一个存放实现 Delayed 接口的数据的无界阻塞队列,只有当数据对象的延时时间达到时才能插入到队列进行存储。如果当前所有的数据都还没有达到创建时所指定的延时期,则队列没有队头,并且线程通过 poll 等方法获取数据元素则返回 null。所谓数据延时期满时,则是通过 Delayed 接口的 getDelay(TimeUnit.NANOSECONDS)来进行判定,如果该方法返回的是小于等于 0 则说明该数据元素的延时期已满。
自定义创建线程的工厂(ThreadFactory)
自定义创建工厂需要实现 java.util.concurrent.ThreadFactory 接口中的 Thread newThread(Runnable r)方法,参数为传入的任务,需要返回一个工作线程。
给线程池中线程起一个有意义的名字,在系统出现问题的时候,通过线程堆栈信息可以更容易发现系统中问题所在。
public class Demo {
    static AtomicInteger threadNum = new AtomicInteger(1);

    public static void main(String[] args) {
        ThreadPoolExecutor executor = new ThreadPoolExecutor(5, 5,
                60L, TimeUnit.SECONDS,
                new ArrayBlockingQueue<Runnable>(10), r -> {
            Thread thread = new Thread(r);
            thread.setName("自定义线程-" + threadNum.getAndIncrement());
            return thread;
        });
        for (int i = 0; i < 5; i++) {
            String taskName = "任务-" + i;
            executor.execute(() -> {
                System.out.println(Thread.currentThread().getName() + "处理" + taskName);
            });
        }
        executor.shutdown();
    }
}
自定义饱和策略
需要实现 RejectedExecutionHandler 接口,然后重写 rejectedExecution()
任务无法处理的时候,记录日志或持久化不能处理的任务
public class Demo {
    static class Task implements Runnable {
        String name;
        public Task(String name) {
            this.name = name;
        }
        @Override
        public void run() {
            System.out.println(Thread.currentThread().getName() + "处理" + this.name);
            try {
                TimeUnit.SECONDS.sleep(5);
            } catch (InterruptedException e) {
                e.printStackTrace();
            }
        }
        @Override
        public String toString() {
            return "Task{" +
                    "name='" + name + '\'' +
                    '}';
        }
    }
    public static void main(String[] args) {
        ThreadPoolExecutor executor = new ThreadPoolExecutor(1,
                1,
                60L,
                TimeUnit.SECONDS,
                new ArrayBlockingQueue<Runnable>(1),
                Executors.defaultThreadFactory(),
                (r, executors) -> {
                    //自定义饱和策略
                    //记录一下无法处理的任务
                    System.out.println("无法处理的任务:" + r.toString());
                });
        for (int i = 0; i < 5; i++) {
            executor.execute(new Task("任务-" + i));
        }
        executor.shutdown();
    }
}
输出
无法处理的任务:Task{name='任务-2'}
无法处理的任务:Task{name='任务-3'}
pool-1-thread-1处理任务-0
无法处理的任务:Task{name='任务-4'}
pool-1-thread-1处理任务-1
输出结果中可以看到有 3 个任务进入了饱和策略中,记录了任务的日志,对于无法处理多任务,我们最好能够记录一下,让开发人员能够知道。任务进入了饱和策略,说明线程池的配置可能不是太合理,或者机器的性能有限,需要做一些优化调整。
扩展线程池
ThreadPoolExecutor 内部提供了 beforeExecute、afterExecute、terminated 这几个方法,可以由开发人员去实现这些方法。
- beforeExecute:任务执行之前调用的方法
- afterExecute:任务执行完成之后调用的方法
- terminated:线程池最终关闭之后调用的方法
合理地配置线程池
要想合理的配置线程池,需要先分析任务的特性,可以从以下几个角度分析:
- 任务的性质:CPU 密集型任务、IO 密集型任务和混合型任务
- 任务的优先级:高、中、低
- 任务的执行时间:长、中、短
- 任务的依赖性:是否依赖其他的系统资源,如数据库连接
性质不同任务可以用不同规模的线程池分开处理。CPU 密集型任务配置尽可能少的线程数量,如配置 CPU 数量+1 个线程的线程池。IO 密集型任务并不是一直在执行任务,不能让 CPU 闲着,则应配置尽可能多的线程,如:CPU 数量*2。混合型的任务,如果可以拆分,将其拆分成一个 CPU 密集型任务和一个 IO 密集型任务,只要这 2 个任务执行的时间相差不是太大,那么分解后执行的吞吐量将高于串行执行的吞吐量。可以通过 Runtime.getRuntime().availableProcessors() 方法获取 CPU 数量。
优先级不同的任务可以使用优先级队列 PriorityBlockingQueue 来处理。它可以让优先级高的任务先得到执行,需要注意的是如果一直有优先级高的任务提交到队列里,那么优先级低的任务可能永远不能执行。
执行时间不同的任务可以交给不同规模的线程池来处理,或者也可以使用优先级队列,让执行时间短的任务先执行。
依赖数据库连接池的任务,因为线程提交 SQL 后需要等待数据库返回结果,如果等待的时间越长 CPU 空闲时间就越长,那么线程数应该设置越大,这样才能更好的利用 CPU。
使用队列的时候建议使用有界队列,有界队列增加了系统的稳定性,如果采用无界队列,任务太多的时候可能导致系统 OOM,直接让系统宕机。
线程池中线程数量的配置
Ncpu = CUP的数量
Ucpu = 目标CPU的使用率,0<=Ucpu<=1
W/C = 等待时间与计算时间的比例
为保存处理器达到期望的使用率,线程池的大小等于:
Nthreads = Ncpu × Ucpu × (1+W/C)
关于线程池,内容比较多, 详情请戳
AQS
AQS 全称是 AbstractQueuedSynchronizer,顾名思义,是一个用来构建锁和同步器的框架,它底层用了 CAS 技术来保证操作的原子性,同时利用 FIFO 队列实现线程间的锁竞争,将基础的同步相关抽象细节放在 AQS,这也是 ReentrantLock、CountDownLatch 等同步工具实现同步的底层实现机制。它能够成为实现大部分同步需求的基础,也是 J.U.C 并发包同步的核心基础组件。
Reference
原子操作类
具有原子操作特征的类,原子操作类提供了一些修改数据的方法,这些方法都是原子操作的,在多线程情况下可以确保被修改数据的正确性。
atomic 包下的这些类都是采用的是乐观锁策略去原子更新数据,在 java 中则是使用 CAS 操作具体实现。
原子更新基本类型
- AtomicInteger:int 类型原子类
- AtomicLong:long 类型原子类
- AtomicBoolean :boolean 类型原子类
AtomicInteger 类的常用方法
public final int get() //获取当前的值
public final int getAndSet(int newValue)//获取当前的值,并设置新的值
public final int getAndIncrement()//获取当前的值,并自增
public final int getAndDecrement() //获取当前的值,并自减
public final int getAndAdd(int delta) //获取当前的值,并加上预期的值
boolean compareAndSet(int expect, int update) //如果输入的数值等于预期值,则以原子方式将该值设置为输入值(update)
public final void lazySet(int newValue)//最终设置为newValue,使用 lazySet 设置之后可能导致其他线程在之后的一小段时间内还是可以读到旧的值。
getAndIncrement 源码
public final int getAndIncrement() {
    return unsafe.getAndAddInt(this, valueOffset, 1);
}
内部调用的是 Unsafe 类中的 getAndAddInt 方法
public final int getAndAddInt(Object var1, long var2, int var4) {
    int var5;
    do {
        var5 = this.getIntVolatile(var1, var2);
    } while(!this.compareAndSwapInt(var1, var2, var5, var5 + var4));
    return var5;
}
atomicInteger 借助了 UnSafe 提供的 CAS 操作(compareAndSwapInt)能够保证数据更新的时候是线程安全的。
使用 AtomicInteger 统计文章浏览次数,模拟 100 人同时浏览文章,每个人浏览 10 次
class demo {
    //访问次数
    static AtomicInteger count = new AtomicInteger();

    //模拟访问一次
    public static void request() {
        count.incrementAndGet();
    }

    public static void main(String[] args) throws InterruptedException {
        int threadSize = 100;
        CountDownLatch countDownLatch = new CountDownLatch(threadSize);
        ExecutorService service = Executors.newFixedThreadPool(10);

        for (int i = 0; i < threadSize; i++) {
            service.execute(() -> {
                for (int j = 0; j < 10; j++) {
                    request();
                }
                System.out.println(Thread.currentThread().getName());
                countDownLatch.countDown();
            });
        }

        service.shutdown();
        countDownLatch.await();
        System.out.println("文章浏览次数=" + count);
    }
}
原子更新数组类型
- AtomicIntegerArray:整形数组原子操作类
- AtomicLongArray:长整形数组原子操作类
- AtomicReferenceArray :引用类型数组原子操作类
AtomicIntegerArray 的常用方法
public final int get(int i) //获取 index=i 位置元素的值
public final int getAndSet(int i, int newValue)//返回 index=i 位置的当前的值,并将其设置为新值:newValue
public final int getAndIncrement(int i)//获取 index=i 位置元素的值,并让该位置的元素自增
public final int getAndDecrement(int i) //获取 index=i 位置元素的值,并让该位置的元素自减
public final int getAndAdd(int delta) //获取 index=i 位置元素的值,并加上预期的值
boolean compareAndSet(int expect, int update) //如果输入的数值等于预期值,则以原子方式将 index=i 位置的元素值设置为输入值(update)
public final void lazySet(int i, int newValue)//最终 将index=i 位置的元素设置为newValue,使用 lazySet 设置之后可能导致其他线程在之后的一小段时间内还是可以读到旧的值。
原子更新引用类型
- AtomicReference:引用类型原子类
- AtomicStampedRerence:原子更新引用类型里的字段原子类
- AtomicMarkableReference :原子更新带有标记位的引用类型
AtomicReference 会存在 ABA 问题,可以使用 AtomicStampedRerence 解决 ABA 的问题
AtomicStampedRerence 类的常用方法
//比较设置,参数依次为:期望值、写入新值、期望时间戳、新时间戳
public boolean compareAndSet(V expectedReference, V newReference, int expectedStamp, int newStamp);
//获得当前对象引用
public V getReference();
//获得当前时间戳
public int getStamp();
//设置当前对象引用和时间戳
public void set(V newReference, int newStamp);
原子更新字段类型
- AtomicIntegerFieldUpdater:原子更新整形字段的值
- AtomicLongFieldUpdater:原子更新长整形字段的值
- AtomicReferenceFieldUpdater :原子更新应用类型字段的值
要想原子地更新对象的属性需要两步:
第一步,因为对象的属性修改类型原子类都是抽象类,所以每次使用都必须使用静态方法 newUpdater() 创建一个更新器,并且需要设置想要更新的类和属性。
第二步,更新的对象属性必须使用 public volatile 修饰符。
上面三个类提供的方法几乎相同,所以我们这里以 AtomicReferenceFieldUpdater 为例子来介绍
public static <U, W> AtomicReferenceFieldUpdater<U, W> newUpdater(Class<U> tclass, Class<W> vclass, String fieldName)tclass:需要操作的字段所在的类
vclass:操作字段的类型
fieldName:字段名称
多线程并发调用一个类的初始化方法,如果未被初始化过,将执行初始化工作,只能初始化一次
public class Demo {
    static Demo demo = new Demo();
    //isInit用来标注是否被初始化过
    volatile Boolean isInit = Boolean.FALSE;
    AtomicReferenceFieldUpdater<Demo, Boolean> updater = AtomicReferenceFieldUpdater.newUpdater(Demo.class, Boolean.class, "isInit");

    /**
     * 模拟初始化工作
     */
    public void init() throws InterruptedException {
        //isInit为false的时候,才进行初始化,并将isInit采用原子操作置为true
        if (updater.compareAndSet(demo, Boolean.FALSE, Boolean.TRUE)) {
            System.out.println(System.currentTimeMillis() + "," + Thread.currentThread().getName() + ",开始初始化!");
            //模拟休眠3秒
            TimeUnit.SECONDS.sleep(3);
            System.out.println(System.currentTimeMillis() + "," + Thread.currentThread().getName() + ",初始化完毕!");
        } else {
            System.out.println(System.currentTimeMillis() + "," + Thread.currentThread().getName() + ",有其他线程已经执行了初始化!");
        }
    }
    public static void main(String[] args) {
        for (int i = 0; i < 5; i++) {
            new Thread(() -> {
                try {
                    demo.init();
                } catch (InterruptedException e) {
                    e.printStackTrace();
                }
            }).start();
        }
    }
}
并发容器
ConcurrentHashMap
CopyOnWriteArrayList
ConcurrentLinkedQueue
ConcurrentSkipListMap
ConcurrentSkipListSet
ConcurrentLinkedQueue
ConcurrentLinkedDeque
BlockingQueue
Reference